
IRMA: reporting, import and export
This page is for risk managers, CISOs, controllers and administrators who want to get data out of IRMA or into it, and for whoever manages retention periods. It explains how to compose a report, how to export a table or report, how to import a list from Excel and how to deal with retention periods and destruction.
New to IRMA? Start with IRMA: getting started. If you want to connect IRMA to a system of your own, such as a BI tool, also read Linking and retrieving data.
The IRMA app is in Dutch. This page quotes its labels in Dutch, with an English gloss in parentheses. What you see depends on the modules turned on for your organization and on your role. If you do not have the right to export or import something, IRMA says so. Ask your administrator.
Where you find it
Section titled “Where you find it”| What | Where |
|---|---|
| Generating reports | Risicomanagement (Risk management) → Rapporten (Reports) → Genereren (Generate) |
| Report templates, house style, KPIs and dashboards | Rapporten, via the tabs Sjablonen (Templates), Huisstijl (House style), KPI’s and Dashboards |
| Risk-bearing capacity | Instellingen (Settings) → Weerstandscapaciteit |
| Importing | Beheer (Administration) → Importeren (Import), or Importeren in a register |
| Your own registers | Menu → Registers → Nieuw register (New register) |
| Retention periods and destruction | Registers → Informatiebeheer (Records management) |
Reports
Section titled “Reports”Under Rapporten → Genereren you make a print-ready report: the Risicoprofiel (Risk profile), the Verklaring van Toepasselijkheid (SoA) (Statement of Applicability), the Maatregelstatus (Control status) or the Auditresultaat (Audit result). You choose the format: PDF, Word (docx), Excel (xlsx) or Markdown (direct in de browser). How that works is described in IRMA: risk management. A report that you generate server-side then appears under Eerdere rapporten (Earlier reports).
Report templates
Section titled “Report templates”On the Sjablonen tab you build a report of your own from blocks.
- Click Nieuw sjabloon (New template) and give a Naam, a Rapporttype (Report type) and an Omschrijving.
- Add blocks with Blok toevoegen (Add block). A block has a Bloksoort (Block kind): Tekst (fixed text), Tabel (Table), Indicatoren (Indicators) or KPI-trend. You bind a table, indicator or KPI block to a data source. Give every block a Sectiekop (Section heading).
- The order of the blocks is the order in the report. Move a block with Blok omhoog (Block up) and Blok omlaag (Block down).
Templates with the label Systeem (System) are IRMA’s standard reports, such as the Integrale risicorapportage (Integral risk report), the VvT / Statement of Applicability, the Auditrapportage, the Bestuurlijke rapportage (ENSIA-stijl) (Board report, ENSIA style) and the Weerstandsvermogen-rapportage (Risk-bearing capacity report). You can use a template as a starting point for a variant of your own.
House style
Section titled “House style”On the Huisstijl tab you set what every generated report carries: the Naam (rapportkop) (Name in the report header), the Voettekst (Footer) and the Huisstijlkleur (hex) (House style color), and your Gemeentelogo (Logo; PNG, JPEG or SVG, at most 1 MiB; Logo uploaden…). Reports carry only your own logo and house style. If you have not set a logo, the report shows a neutral name.
Risk-bearing capacity
Section titled “Risk-bearing capacity”The Weerstandsvermogen-rapportage sets your risk profile against your organization’s financial buffer. The report follows this structure: introduction, risk profile (identification, consequence and likelihood classes, risk simulation, sensitivity analysis, top 10 financial risks and top 10 per consequence type), risk-bearing capacity (required and available capacity and the ratio), conclusions and an appendix with the risk profile per risk area.
- Estimate. Give your risks a financial estimate on the risk page under Financiële impact (VaR). Risks without an estimate do not take part.
- Simulate. Run a simulation under Monte Carlo / VaR. The required capacity in the report is the Value-at-Risk (P90) of the most recently completed simulation. The report names the run and the time. The simulation uses the financial estimate you fill in for each risk.
- Fill in the available capacity. Under Instellingen → Weerstandscapaciteit you fill in the freely usable financial buffer. If you have broken the buffer down, add items under Reserveposten (Reserve items) with Post toevoegen (Add item), each with a name, description and amount; the sum of the items is then the capacity and the separate amount no longer counts. If nothing is set, IRMA says the capacity is unknown, instead of calculating with a buffer of zero.
- Make the report. Choose the template Weerstandsvermogen-rapportage. The ratio is the available divided by the required capacity, with a risk label on the standard table.
You can adjust this template: leave out blocks, change the order or insert text of your own.
On the KPI’s tab you follow performance indicators with a time series and a trend.
- Click KPI toevoegen (Add KPI), give a Naam and choose the Bron (Source): an existing measurement from the Meetprogramma (Measurement programme; the series is the measurement history) or a Berekend (Calculated) metric (a daily snapshot). Set a Doelwaarde (Target value) and the Richting (Direction): Hoger is beter (Higher is better) or Lager is beter (Lower is better).
- The KPI-overzicht (KPI overview) shows per KPI the latest value, the trend (stijgend (rising), dalend (falling) or stabiel (stable)) and the verdict: Op koers (On track), Buiten doel (Off target), Geen doel ingesteld (No target set) or Nog geen data (No data yet). A trend needs enough measurements.
- KPIs are not separate from the measurement programme: you record a measurement once, under Objectives and measurement programme.
Role dashboards
Section titled “Role dashboards”The Dashboards tab holds the Rol- en functiedashboards (Role and function dashboards). You only see the dashboards you are a role member of, dashboards for the whole organization and your own private dashboards.
- Click Dashboard aanmaken (Create dashboard), give a Naam, choose the Doelgroep-rol (Target role) and the Zichtbaarheid (Visibility): Alleen rolleden (Role members only), Hele organisatie (Whole organization) or Alleen ikzelf (Only me).
- A dashboard consists of widgets, such as Toetsingsstadia (Testing stages) of controls and Risico’s per afdeling (Risks per department). With the drilldown you choose a node in the organization tree, from team to board.
Besides these dashboards you have the Overzicht (Overview) as your start page and, on Impact en beheersing, the dashboard with importance set against control.
Exporting
Section titled “Exporting”- A table or register. Click Exporteren (Export) above a table and choose Excel (.xlsx) or CSV (.csv). You get the columns and rows as the table shows them at that moment: so adjust the filters, the search and the columns first. An export contains at most 5000 rows and 100 columns. If a register has more rows, filter and export in parts. This Excel or CSV export of a table is not recorded in the audit trail.
- A report. As PDF, Word, Excel or Markdown; see Reports. Downloading a report is recorded in the audit trail.
- Records management. You export the records as Export XML or Export JSON; see Retention periods and destruction. This export is recorded in the audit trail.
- Evidence files and incident attachments. You download these separately at the evidence item or the incident. Every download of an evidence file or incident attachment is in the audit trail.
- For a BI tool or data warehouse. See Linking and retrieving data.
Importing
Section titled “Importing”Do you already have a list in Excel or CSV? Import it instead of retyping it. There are two entry points: Importeren in a register (the right target is then already chosen) and Beheer → Importeren for all targets.
You can import into:
- Risico’s (Risks), Assets, Beheersmaatregelen (Controls) and Documenten (Documents);
- the Verwerkingsregister (Record of processing activities), with VNG-import (CSV) from the register;
- VIC-controlepunten and VIC-deelwaarnemingen (internal control points and partial observations), for a migration from an existing internal control tool;
- every Eigen register (own register) you built yourself.
The import wizard has four steps: Upload, Kolommen koppelen (Link columns), Validatie (Validation) and Bevestigen (Confirm).
- Under Wat importeer je? (What are you importing?) choose the target and supply a file: Excel (.xlsx) or CSV. Or paste data, for example cells from Excel. IRMA recognizes the sheet, the separator and the row with column headings by itself; you adjust it if it is not right. Under Zo leest IRMA je bestand (How IRMA reads your file) you see a preview.
- Link every field to a column in your file. Required fields are marked Verplicht (Required).
- At Validatie you see the first 50 rows with per row Geldig (Valid) or Fout (Error), and the counters Rijen (Rows), Geldig and Fout. Nothing has been saved yet.
- Click Importeer … geldige rijen (Import … valid rows). Rows with an error are skipped and come back as Afgewezen (Rejected). You then see how many rows are Geïmporteerd (Imported).
IRMA cannot read an old Excel file (.xls) or a workbook with a password: save it as .xlsx without a password, or as CSV. A file that is too large to read in the browser you split or save as CSV. For risks, see also Importing risks from Excel or CSV.
The import wizard reads Excel (.xlsx) and CSV. Other files, such as Word or PDF, you add as a document or evidence.
Building your own registers
Section titled “Building your own registers”Besides the standard registers you build registers yourself, for example for a list that fits no standard register.
- Go to Registers and click Nieuw register, or choose Uit sjabloon (From template) for a recommended register under Standaard registers (Standard registers) with Toevoegen (Add).
- Give the register a Naam van het register, an Omschrijving and an Icoon (Icon).
- Add columns with Kolom toevoegen (Add column). Per column choose the Kolomnaam (Column name), the Type (Tekst, Lange tekst, Getal, Datum, Ja/nee, Keuzelijst, URL or E-mail) and whether the column is Verplicht. For a choice list you separate the Keuzes (Choices) with a comma. With Omhoog and Omlaag you set the order.
- Click Register aanmaken (Create register). Then you add rows with Rij toevoegen (Add row), or import them from Excel or CSV.
A register of your own is under Mijn registers (My registers). You link a row or the whole register to another object, such as a supplier, asset, risk or document, and you change the definition later with Register bewerken (Edit register). The fields of the risk and the control themselves are fixed. If you need extra data, build a register of your own and link it to the risk or the control.
Retention periods and destruction
Section titled “Retention periods and destruction”Informatiebeheer (menu Registers → Informatiebeheer) is the workbench for archive and records management: retention periods, metadata and controlled destruction, in line with the Dutch Archives Act. It belongs to the Records / archive module; if you do not see it, ask Prudai or your administrator.
At the top are the counters Records, Met MDTO-metadata (With MDTO metadata), Vernietigbaar (Destroyable) and Verklaringen (Declarations). The tabs are Records, Vernietiging (Destruction), Dossiers (Files) and Selectielijst (Selection list).
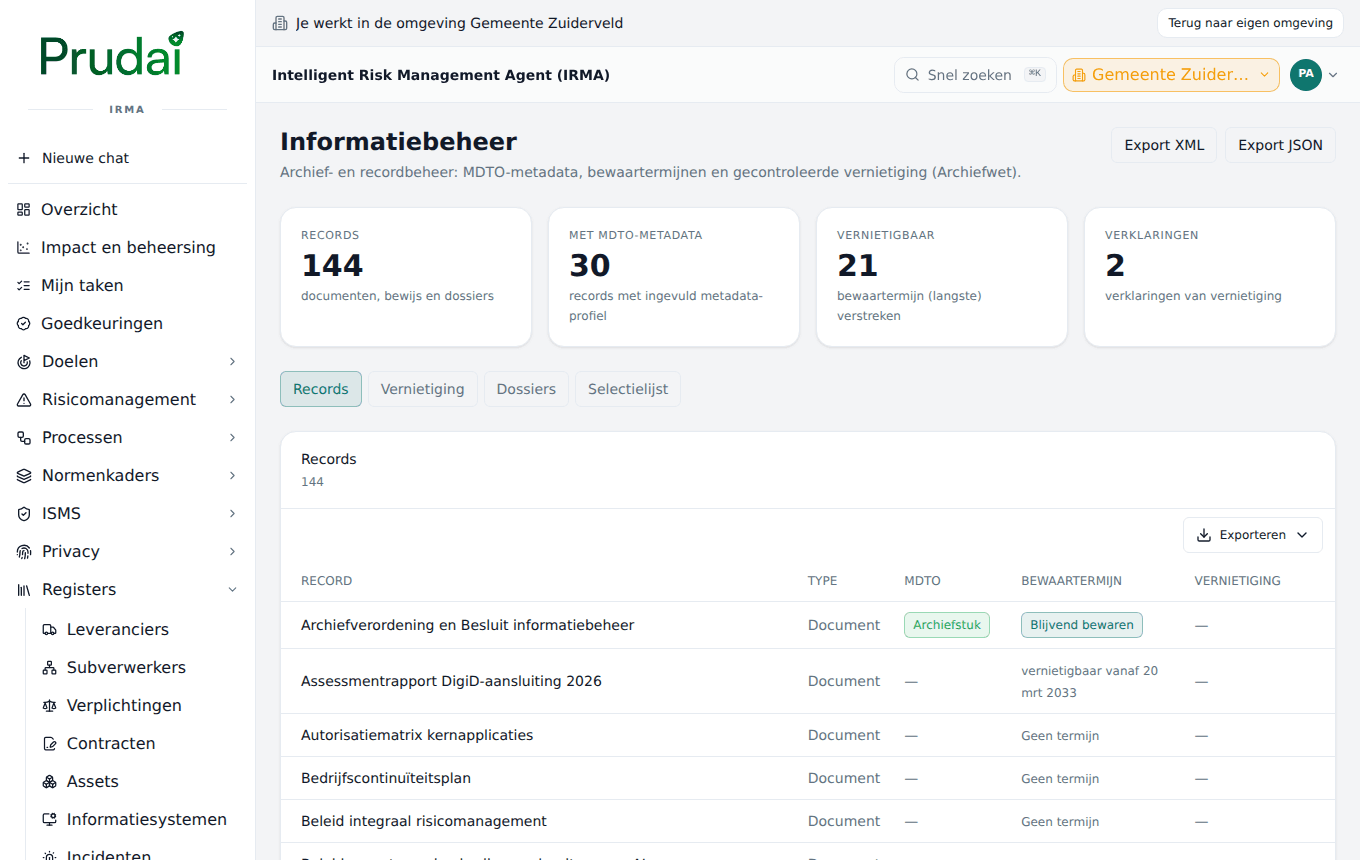
Records and metadata
Section titled “Records and metadata”Documents, evidence and files appear here automatically as a record. Open a record for the details:
- MDTO-metadata: the metadata for durably accessible government information (MDTO 1.0 of the Dutch National Archives). Fields you leave empty stay empty; IRMA fills in nothing itself. Save with MDTO opslaan (Save MDTO).
- Bewaartermijn (langste termijn wint) (Retention period, the longest period wins): all periods that apply, from a direct rule, a file, the process, the document classification or the evidence registration. The longest determines the destruction date. In the list each record shows vernietigbaar vanaf (destroyable from), Blijvend bewaren (Keep permanently), Wacht op trigger (Waiting for trigger) or Geen termijn (No period).
- You add a rule with a Selectielijst-categorie (Selection list category); the period and the basis then follow from that category. With Regel toevoegen (Add rule) you record it.
In addition you set default periods per document class under Documenten → Classificaties (the default review and retention period in months, only in the Opzetten (Setting up) phase), per evidence item with Bewaartermijn (maanden) and per processing activity with the text Bewaartermijn in the record of processing activities.
Controlled destruction
Section titled “Controlled destruction”IRMA destroys nothing automatically. Destruction goes in three steps and with separation of duties:
- Propose. Under Vernietigbaar (termijn verstreken) (Destroyable, period passed) are the records whose longest period has passed. Choose Vernietiging voorstellen (Propose destruction) and give the Grondslag / reden (Basis / reason).
- Approve. A records manager, someone with rights on Informatiebeheer (see Roles and rights), assesses the proposal under Vernietigingsvoorstellen (Destruction proposals) and chooses Goedkeuren (Approve) or Afwijzen (Reject). The requester cannot approve their own proposal.
- Carry out. After approval you choose Uitvoeren (Carry out). That deletes the content permanently. The metadata and the declaration of destruction remain: what was destroyed, when, by whom and on what basis.
Under Verklaringen van vernietiging (Declarations of destruction) that registration is kept permanently.
Irreversibly destroying the content of a record happens through Informatiebeheer. What happens to your data after the end of the agreement is described under Taking your data with you.