IRMA: administration
This page is for administrators of the IRMA app: people with the Beheerder (Administrator) role in IRMA. It explains how to assign roles, who may read what, how to set up the lists for risks, and what Prudai turns on for you on request. How to use the app is covered in IRMA: getting started.
The IRMA app is in Dutch. This page quotes its labels in Dutch, with an English gloss in parentheses.
Where you administer
Section titled “Where you administer”- Beheer (Administration) is at the bottom of the menu. You only see it with administrator rights.
- You open Instellingen (Settings) via the account menu at the top right (the circle with your initials) → Instellingen (Settings).
Under Beheer (Administration) you find:
| Item | What it is for |
|---|---|
| Rollenbeheer (Role management) | Roles, their rights per section and who has which role. |
| Accounts & toegang (Accounts & access) | A register of accounts, API keys and service accounts in your own systems: who has access and where the secret is stored. You only record a reference, never the secret itself. This is not about IRMA users. |
| Uitdiensttreding (Offboarding) | Offboarding per employee, with a checklist you set up yourself. |
| Afdelingen (Departments) | Your organization’s units and their members. Needed for read access per department. |
| Service-tokens (Service tokens) | Keys your own systems use to deliver incidents. See Service tokens. |
| Taaksjablonen (Task templates) | Recurring tasks per role, which IRMA creates by itself each period. |
| Taakstatussen (Task statuses) | The statuses of the action list. The task board columns follow this set. |
| Kansen en gevolgen (Likelihood and consequences) | Your organization’s likelihood and consequence classes, plus extra consequence dimensions such as reputation, time or environment. The Referentiebeeld kans en impact (Reference picture for likelihood and impact) on a risk shows these classes. |
| Risicotags (Risk tags) | Tags for risks. See Risk tags. |
| Audittrail (Audit trail) | Who did what and when. See Audit trail. |
| Importeren (Import) | Read in risks, assets, controls, documents, the record of processing, internal control points and partial observations (when switching from another tool) or a register of your own from Excel or CSV. See Importing risks from Excel or CSV. |
| Trust Center | Your public Trust Center. See Trust Center. |
Under Instellingen (Settings) you find, among others, Weergave (Display, including the ISMS phase), Leestoegang per afdeling (Read access per department), ISMS-model (ISMS model), Risicoacceptatie (Risk acceptance), Weerstandscapaciteit (Risk-bearing capacity), Risicotaxonomie (Risk taxonomy), Risicotags (Risk tags), Notificaties (Notifications) and Documenten genereren (Generate documents).
Roles and rights
Section titled “Roles and rights”In IRMA, your role determines what you may do. You manage roles under Beheer (Administration) → Rollenbeheer (Role management).
The standard roles
Section titled “The standard roles”Every organization starts with twelve preset roles of the type Sjabloon (Template):
| Role | What it is for | May create and edit by default |
|---|---|---|
| Beheerder (Administrator) | Full rights; the administrator of the organization. | everything, including Beheer (Administration) |
| Bestuurder (Board member) | Management board: sets risk appetite and policy, holds the management review. | nothing; reads everything except Beheer (Administration) |
| Auditor | Internal auditor: independent testing and audits. | Audits & CAPA |
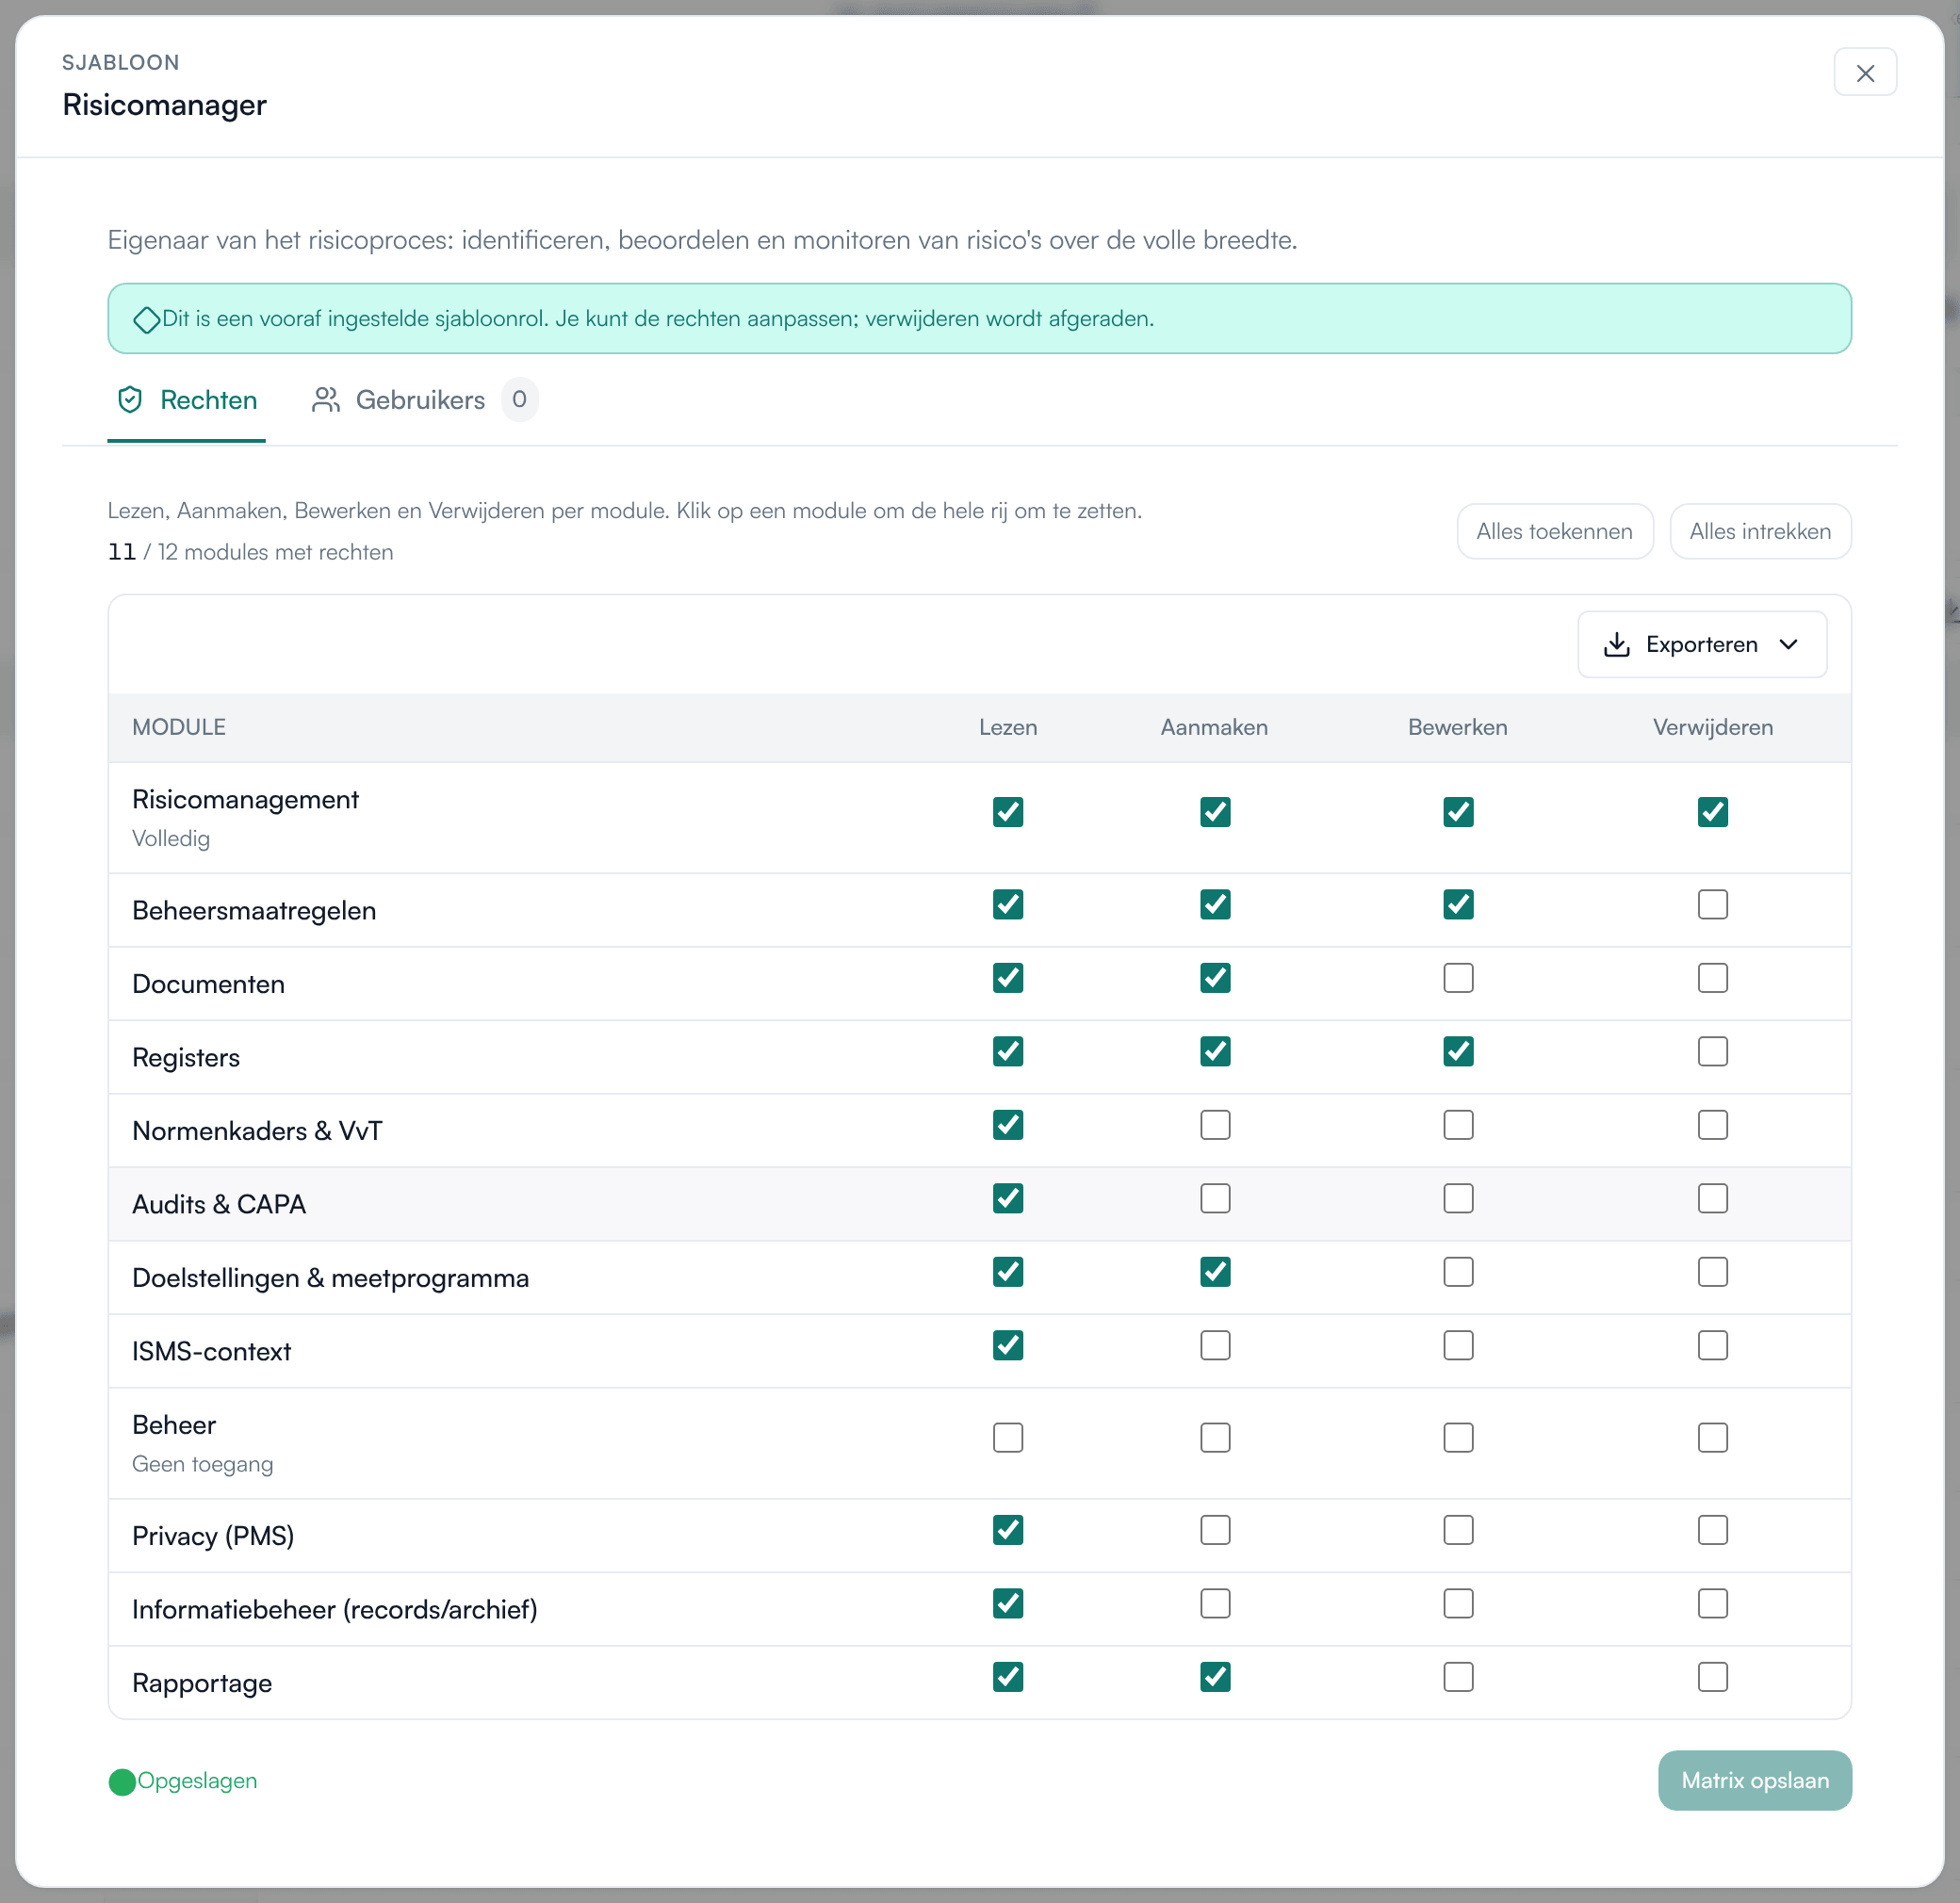
| Risicomanager (Risk manager) | Owner of the risk process. | Risicomanagement (Risk management), Beheersmaatregelen (Controls), Registers; create only in Documenten (Documents), Doelstellingen & meetprogramma (Objectives & measurement programme) and Rapportage (Reporting) |
| CISO | Information security and the ISMS. | Risicomanagement, Beheersmaatregelen, Documenten, Registers, Normenkaders & VvT (Frameworks & SoA), ISMS-context (ISMS context); create only in Doelstellingen & meetprogramma and Rapportage |
| Functionaris Gegevensbescherming (FG) (Data protection officer) | Privacy oversight, DPIAs and the record of processing. | Privacy (PMS); create only in Documenten and Rapportage |
| Compliance-officer (Compliance officer) | Laws, regulations and obligations. | Documenten, Registers, Normenkaders & VvT; create only in Beheersmaatregelen, ISMS-context and Rapportage |
| Kwaliteitsmanager (Quality manager) | Quality system, improvement cycles and objectives. | Beheersmaatregelen, Documenten, Doelstellingen & meetprogramma, ISMS-context; create only in Normenkaders & VvT and Rapportage |
| Arbocoördinator (Health and safety coordinator) | Health and safety, risk inventory and prevention. | create only in Risicomanagement and Beheersmaatregelen |
| Controller | Financial control and reporting. | Rapportage; create only in Risicomanagement |
| Manager | Line manager; owner of department risks. | create only in Beheersmaatregelen |
| Risico-eigenaar (Risk owner) | Owner of a specific risk. | create only in Risicomanagement and Beheersmaatregelen |
“Create only” means the role may add new items but may not edit existing ones. By default only the Beheerder (Administrator) may delete, plus the Risicomanager (Risk manager) in Risicomanagement and the FG (Data protection officer) in Privacy (PMS). These are the default rights. You can adjust them per role in the Rechtenmatrix (Rights matrix). You can also create a role of your own with Rol toevoegen (Add role); it has the type Eigen (Custom).
Adjusting rights
Section titled “Adjusting rights”- Go to Beheer (Administration) → Rollenbeheer (Role management) and click a role. Choose Rol en rechten openen (Open role and rights).
- The Rechten (Rights) tab shows the Rechtenmatrix (Rights matrix). For each section, tick what the role may do: Lezen (Read), Aanmaken (Create), Bewerken (Edit) and Verwijderen (Delete).
- Click the name of a section to turn the whole row on or off. Alles toekennen (Grant all) and Alles intrekken (Revoke all) do this for all sections at once.
- Click Matrix opslaan (Save matrix). Wijzigingen ongedaan maken (Undo changes) takes you back to the saved state.
Giving someone a role
Section titled “Giving someone a role”- Open the role and go to the Gebruikers (Users) tab.
- Under Gebruiker toewijzen (Assign user), enter your colleague’s user ID and click Toewijzen (Assign). If you do not know the ID, ask support@prudai.com.
A person can have several roles; their rights then add up.
How roles work in practice:
- Without a role you can only read. A colleague without a role can read everything but cannot create or change anything. So give everyone who works in IRMA a role.
- Whoever creates an organization themselves becomes Beheerder (Administrator). If Prudai sets up your organization, Prudai assigns the first roles.
- The role also shapes the menu. Which main items someone sees by default follows from their role. Beheerder (Administrator) and Bestuurder (Board member) see all of your organization’s main items.
- Someone without the right for an action gets a message that they do not have the rights for it.
- Rights are enforced. Rollenbeheer (Role management) still shows the notice Handhaving is nu adviserend (Enforcement is currently advisory). That notice is out of date: what a role may not do, a person really cannot do.
Read access per department
Section titled “Read access per department”By default, everyone with access to a register reads the whole organization. If you want employees to see only their own department’s data, turn on read access per department.
Owner department
Section titled “Owner department”Risks, controls and tasks have the field Eigenaar-afdeling (Owner department). One department is the owner. You link other departments as involved via the item’s links. The field is always there, even when read access per department is off.
Recording departments and members
Section titled “Recording departments and members”An employee reads their own department and all departments below it. This is how you set that up:
- Record your departments under Beheer (Administration) → Afdelingen (Departments).
- In the Personenregister (People register, under Registers), link a colleague’s user account to a person.
- Add that person as a member of the right department.
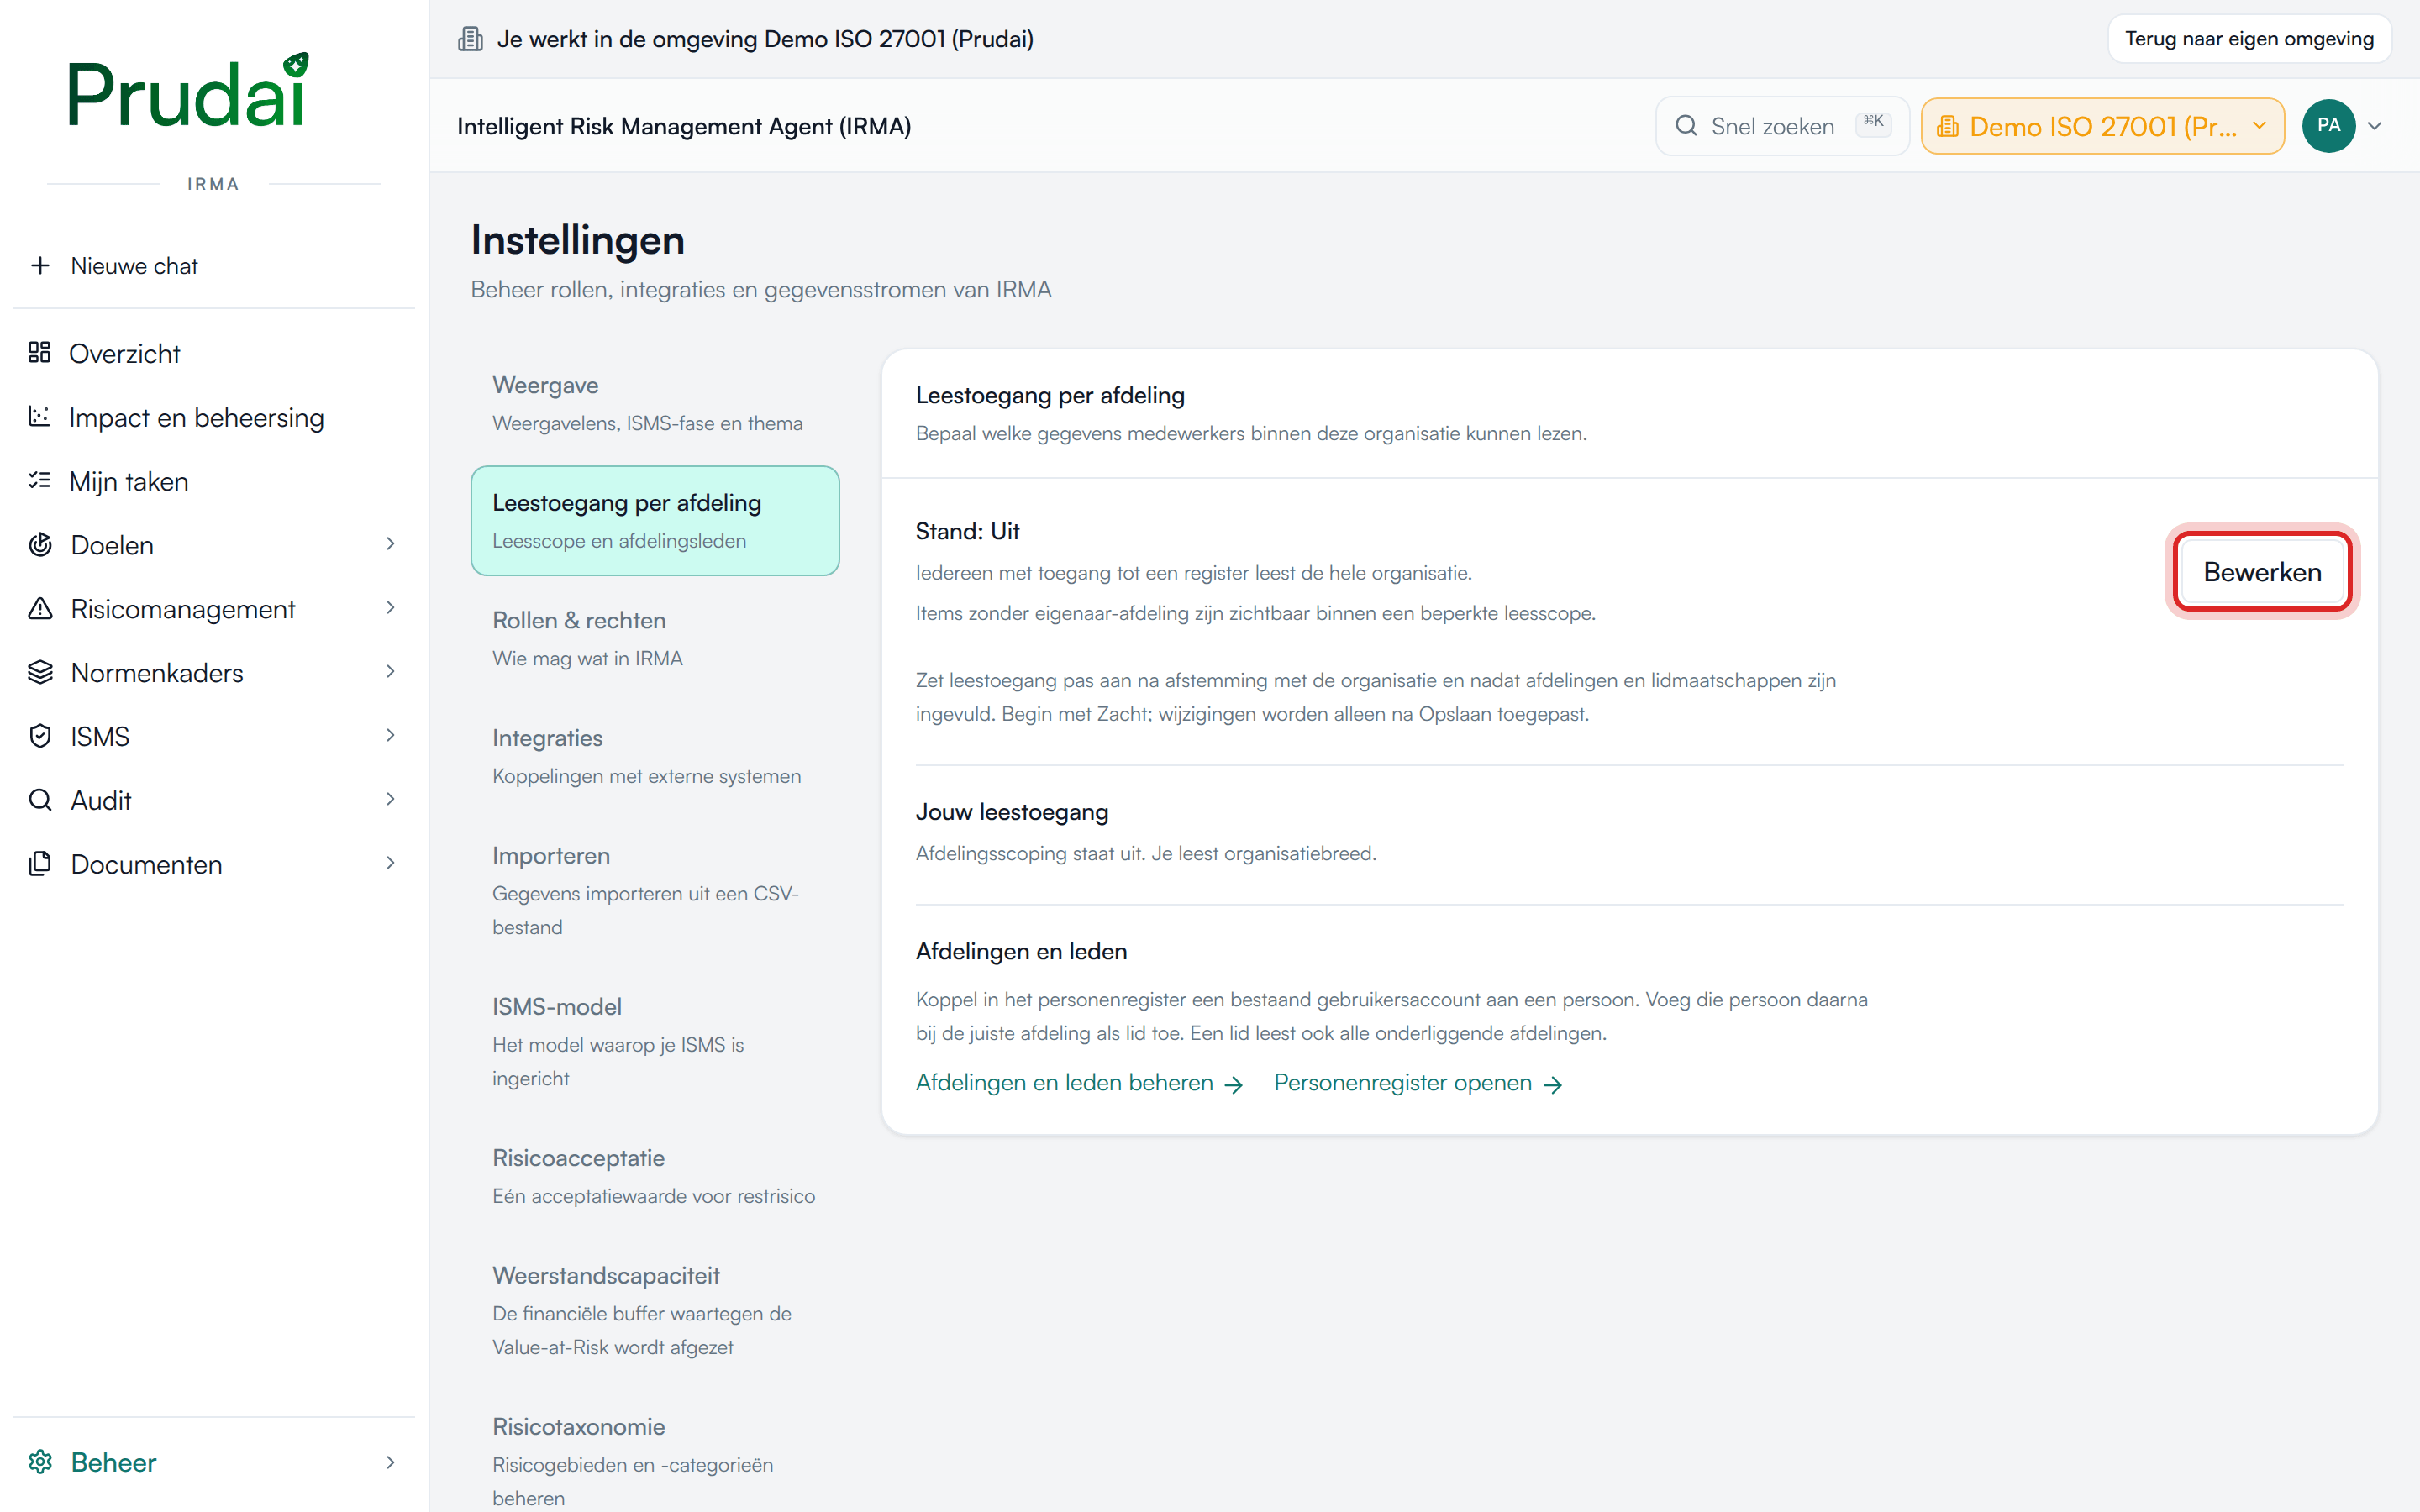
Under Instellingen (Settings) → Leestoegang per afdeling (Read access per department) you also find the buttons Afdelingen en leden beheren (Manage departments and members) and Personenregister openen (Open people register).
Choosing the mode
Section titled “Choosing the mode”Go to Instellingen (Settings) → Leestoegang per afdeling (Read access per department) and click Bewerken (Edit). Choose the Stand (Mode):
| Mode | What happens |
|---|---|
| Uit (Off, default) | Everyone with access to a register reads the whole organization. |
| Inregelen (Phase-in) | Department members read their department and the departments below it. Anyone without a department still sees the whole organization for now. Use this mode to complete the set-up. |
| Strikt (Strict) | Department members read their department and the departments below it. Anyone without a department sees empty core registers. |
Items zonder eigenaar-afdeling meenemen (Include items without an owner department) determines whether items without an owner department stay visible. Click Opslaan (Save); only then does the change take effect.
Do not turn this on lightly. First record all departments and members, and start with Inregelen (Phase-in). Agree on turning it on with Prudai in advance via support@prudai.com, including which roles should keep reading organization-wide. You can always switch back to Uit (Off).
What employees notice
Section titled “What employees notice”- At the top right they see a label with their read access, such as Binnen je afdelingen (Within your departments) or Organisatiebreed (Organization-wide).
- A register shows how many items they can read: Toegang tot … van … items in dit register (Access to … of … items in this register).
- Overviews of the ISMS as a whole get the label Organisatiebreed (Organization-wide).
- Some overviews, such as the Impact en beheersing (Impact and control) dashboard, reports, Monte Carlo, the spread and consensus of a group assessment, the internal audit and the progress on Controleplannen (Control plans), are only available to people who may read the whole organization. Others see Dit overzicht is alleen beschikbaar voor wie de hele organisatie mag lezen… (This overview is only available to people who may read the whole organization…). On Controleplannen, the key figure Uitgevoerd (Performed) then shows Niet te berekenen binnen je leesscope (Cannot be calculated within your read scope), and the Voortgang (Progress) of each plan shows a dash.
Menu sections
Section titled “Menu sections”Prudai turns the main items of your organization’s menu on or off. This is done on request, via support@prudai.com. It concerns Risicomanagement (Risk management), Doelen (Objectives) and ISMS, Privacy, Registers, Normenkaders (Standards frameworks), Processen (Processes), Interne controle (Internal control) and Audit. Interne controle (Internal control) automatically brings Processen (Processes) and Risicomanagement (Risk management) along; Privacy brings Risicomanagement (Risk management) along. Overzicht (Overview), Documenten (Documents) and Beheer (Administration) are always there.
Within what your organization has, an employee’s role determines which main items they see by default. See Roles and rights.
Risk taxonomy
Section titled “Risk taxonomy”Under Instellingen (Settings) → Risicotaxonomie (Risk taxonomy) you manage two lists that you attach to risks:
- Risicogebieden (Risk areas): where in the organization a risk plays out, such as purchasing, HR or IT.
- Risicocategorieën (Risk categories): what kind of risk it is, such as financial or legal. A new organization starts with nine standard categories.
Quick start with a standard set. Click Standaardset toevoegen (Add standard set) and choose a Set. For risk areas there are sets for Bedrijfsvoering (voor elke organisatie) (Business operations, for every organization), Gemeente (Municipality), Onderwijs (Education), Woningcorporatie (Housing association) and Waterschap (Water authority). For categories there is Standaardcategorieën (9) (Standard categories). Tick what you want and add it. IRMA skips names you already have; nothing is overwritten. Afterwards you can rename or delete anything.
Managing a value yourself. Waarde toevoegen (Add value) creates a value with a Naam (Name) and a Volgorde (Order; lower values appear higher in the lists). Set a value to inactive if it should no longer be selectable; existing risks keep it. If you delete a value, the classification of existing risks falls back to “none”.
Risk tags
Section titled “Risk tags”Tags are free labels for risks, cutting across area and category, for example a project name. A risk can have several tags. Users choose tags on a risk and can create new ones there. How to filter and select by tag is covered in IRMA: risk management.
You manage the list under Beheer (Administration) → Risicotags (Risk tags), or Instellingen (Settings) → Risicotags (Risk tags):
- Waarde toevoegen (Add value) creates a new tag.
- Via the row menu you change the name or Volgorde (Order), set a tag to inactive, or delete it. An inactive tag stays on existing risks but can no longer be chosen.
Environments
Section titled “Environments”Besides your organization’s environment, every user can create extra environments, empty or with ISO 27001 demo data. How this works is covered in IRMA: getting started. As an administrator, it is good to know that:
- An extra environment is completely separate from your organization: its own data, its own roles, its own settings.
- Whoever creates an environment becomes its Beheerder (Administrator) and is its only user.
- Everyone can create up to 10 environments of their own.
Service tokens
Section titled “Service tokens”With a service token, a system of your own, such as your monitoring or a script, automatically delivers incidents to the Incidenten (Incidents) register, without signing in.
- Go to Beheer (Administration) → Service-tokens (Service tokens) and click Toevoegen (Add).
- Give the token a Naam (Name) that identifies the system.
- Under Scopes, choose what the token may do: incidenten lezen (read incidents) and/or incidenten aanleveren (deliver incidents).
- Click Token aanmaken (Create token).
- Copy the token immediately with Kopiëren (Copy). You only see it once: IRMA does not store the token itself.
The list shows the Prefix, the Scopes and Laatst gebruikt (Last used) for each token. If a system is retired or a token leaks, choose Intrekken (Revoke). Systems using that token can no longer deliver anything. For the technical connection, contact support@prudai.com.
Audit trail
Section titled “Audit trail”Under Beheer (Administration) → Audittrail (Audit trail) you see who did what and when: changes to registers, decisions in tasks and workflows, and sensitive access such as exports, reports and downloads of evidence documents.
- The trail cannot be altered: entries cannot be changed or deleted, and each entry is linked to the previous one.
- Filter on Actie (Action), Entiteitstype (Entity type), Actor, Vanaf (From) and Tot en met (Up to and including), then click Filteren (Filter). Wissen (Clear) removes the filters.
- Each entry shows who did it: a gebruiker (user), the assistent (assistant) or the systeem (system).
- With Ketting verifiëren (Verify chain), IRMA checks that the whole trail is still intact.
Trust Center
Section titled “Trust Center”A Trust Center is a public page where your organization shows its security and compliance position: certifications, controls, sub-processors, documents, frequently asked questions and updates. The page takes its data live from IRMA.
- Go to Beheer (Administration) → Trust Center.
- Fill in the details, such as Weergavenaam (Display name), Slug (publieke URL) (Slug, public URL), Beveiligingsverklaring (hero) (Security statement) and Beveiligingscontact (e-mail) (Security contact), and choose what to show under Zichtbare secties (Visible sections). Click Opslaan (Save).
- Check the result with Voorbeeld bekijken (View preview). Only your own organization sees this preview.
- Turn on Ingeschakeld (Enabled), click Opslaan (Save) and then Publiceren (Publish). The page is only public when your Trust Center is both enabled and published. Open publieke pagina (Open public page) shows it.
Good to know:
- A Trust Center is off by default. Nothing is visible until you enable and publish it. Publicatie intrekken (Withdraw publication) takes it offline again.
- Only data marked as public appears on the page.
- Documents only appear after the publication step in Publicatieoverzicht (Publication overview). That item is only in the menu in the ISMS phase Onderhoud (Maintenance); see The ISMS phase.
- With Geheimhoudingsverklaring (NDA) (Non-disclosure agreement) you set the text a visitor accepts before requesting restricted documents.
- Visitors choose between Nederlands and English themselves.
Letting the assistant record: IRMA Management
Section titled “Letting the assistant record: IRMA Management”By default, the IRMA assistant in chat only reads along in your registers. With the IRMA Management capability (a capability of the assistant, not the Beheer (Administration) menu), the assistant also records things in the app itself, always only after your approval. IRMA Management is available on request: Prudai turns it on for your organization. Request it via support@prudai.com. If it has just been turned on, start a new chat.
What the assistant then records
Section titled “What the assistant then records”- Risks in the risk register. The assistant can also scan your own documents for risks and offer them as a proposal.
- Controls: new controls and the status of existing controls. A new control starts as Gepland (Planned), unless the proposal you approve names a different status.
- The SoA justification for a requirement, as a proposal.
- Documents: a draft policy, a document from your project or case, and folders in Documenten (Documents). A document comes in as a draft; you decide when it is final.
- Processes and internal control: process steps and connections, proposals for risks and controls on a process step, internal control findings, actions and responses, and control plans.
The assistant does not delete anything. In the conversation you see each step as a line, for example Record approved controls in IRMA or Record the SoA justification as a proposal in IRMA.
How approval works
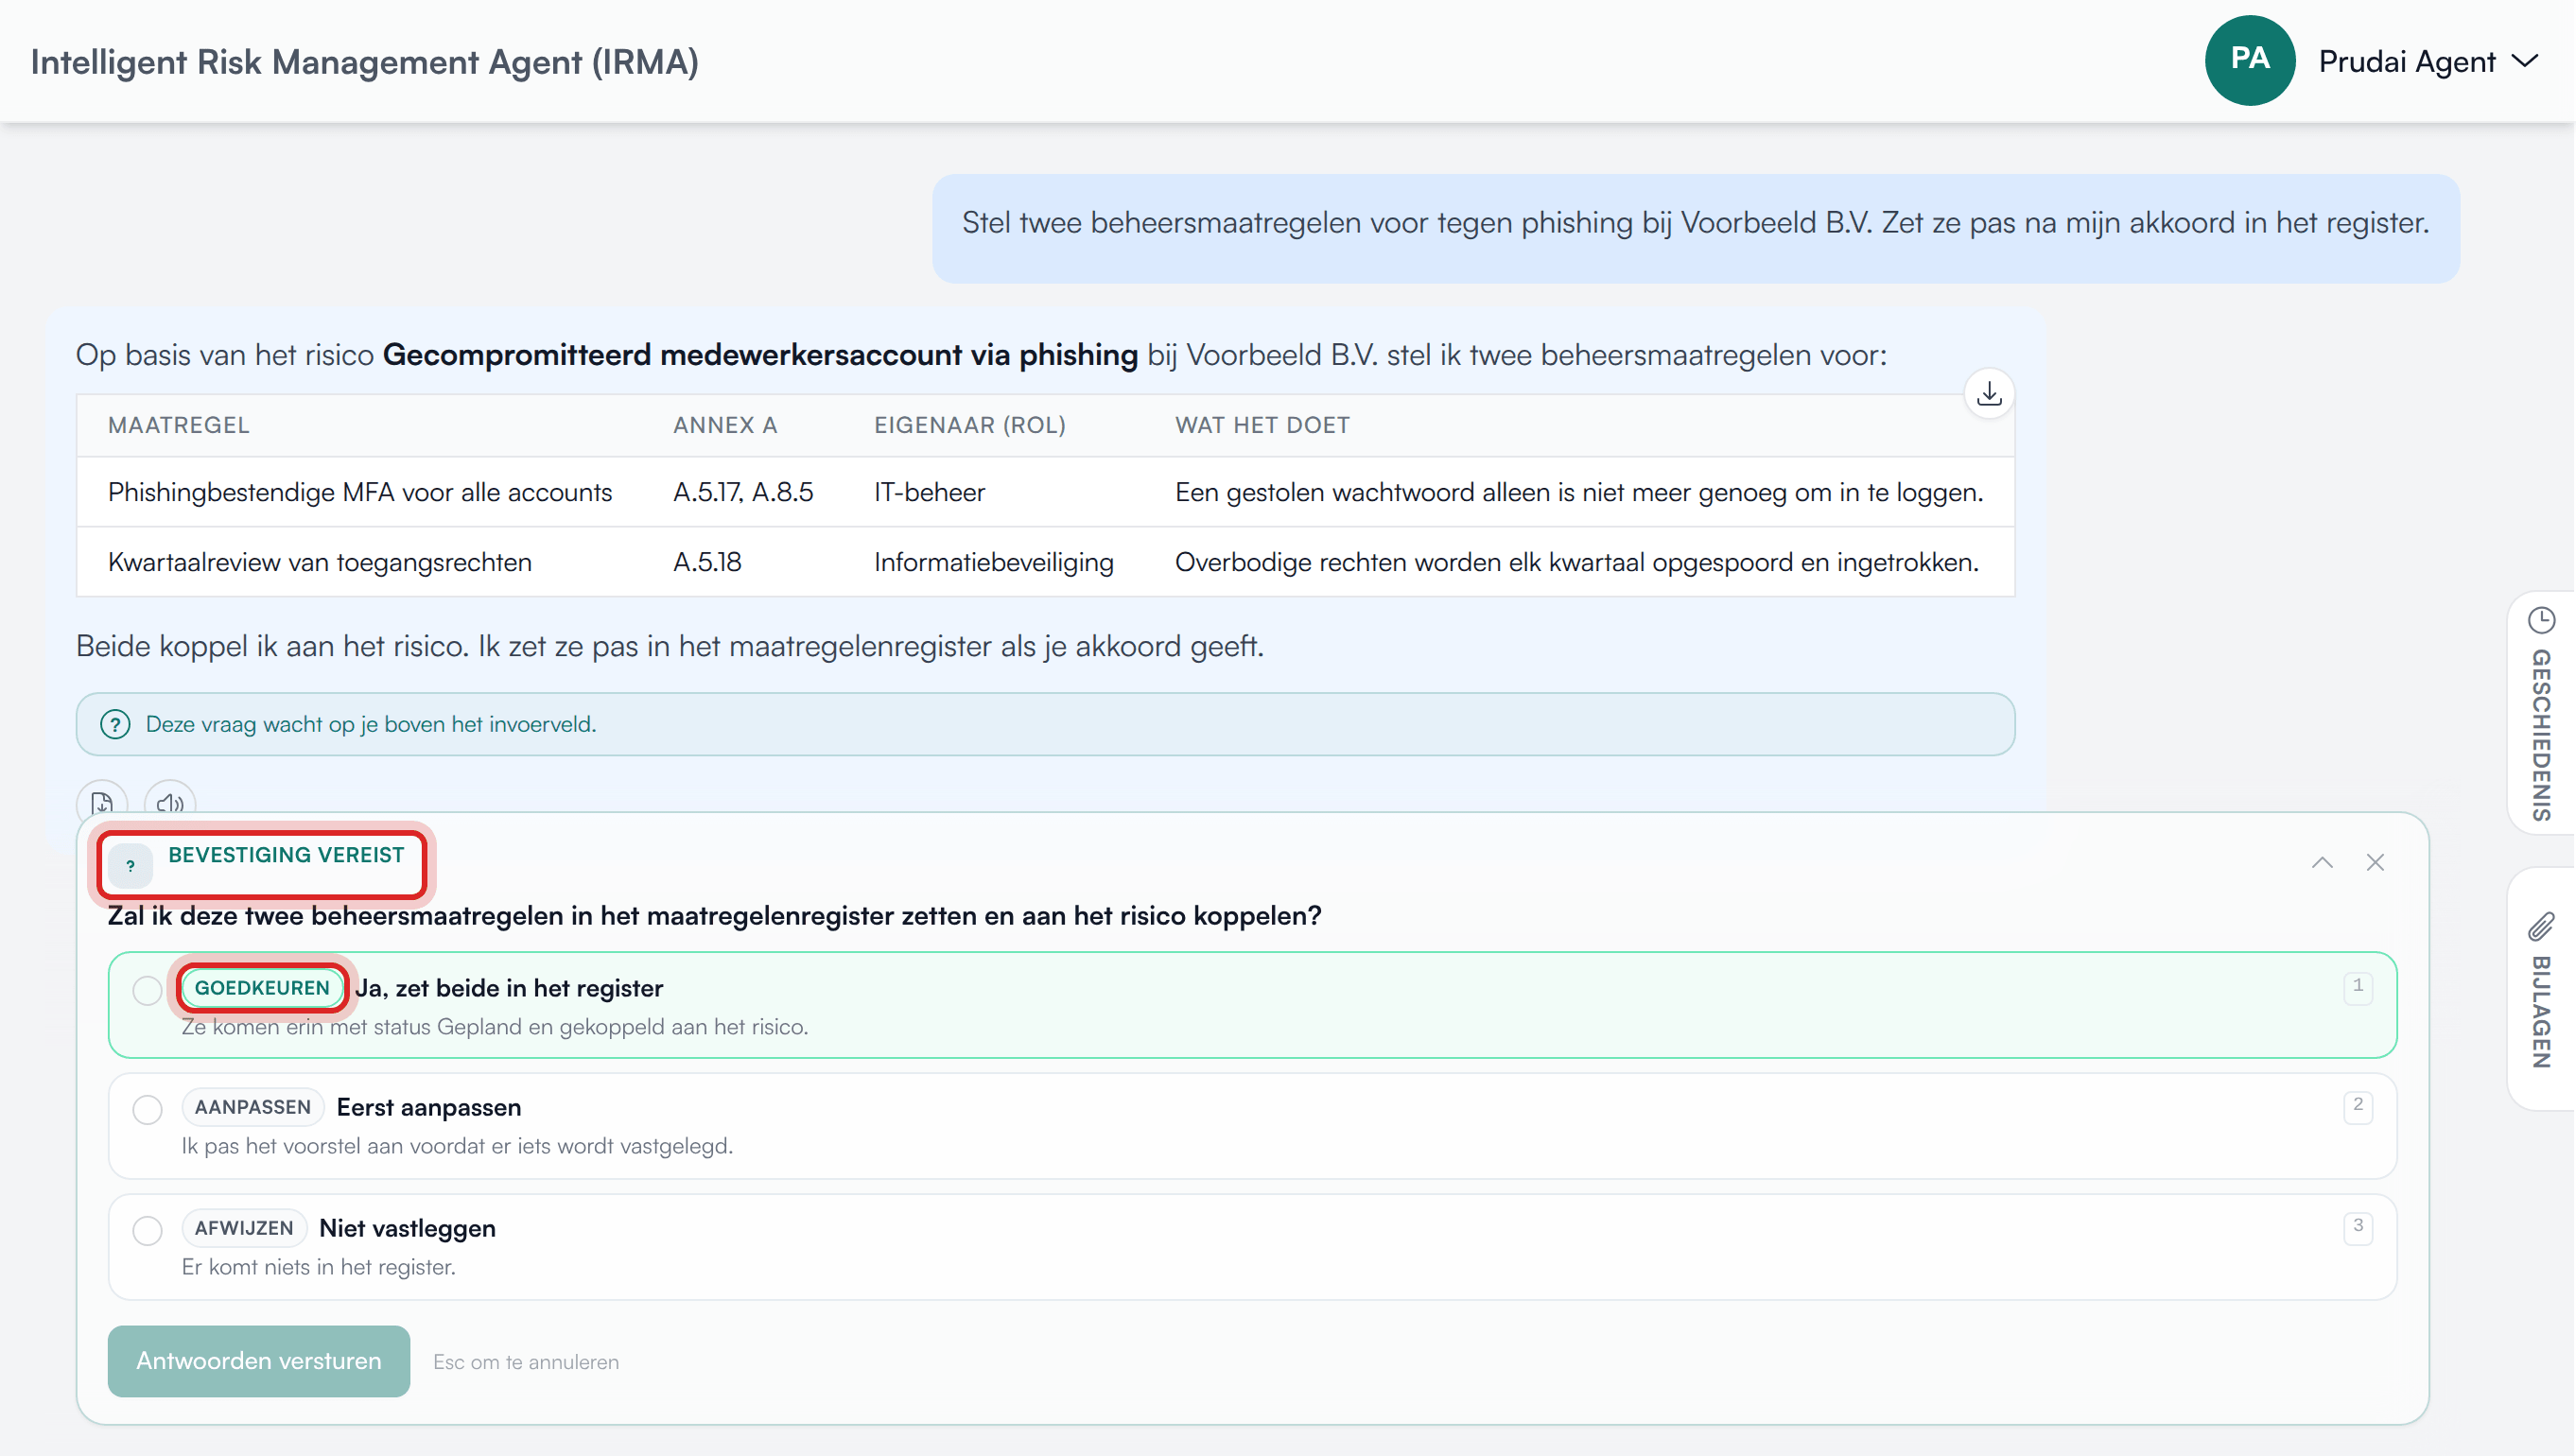
Section titled “How approval works”- The assistant first shows its proposal.
- It asks for your approval on a card headed Confirmation required.
- If you choose the option marked Approve, it records the proposal. If you choose Decline, nothing happens. Revise asks for a different proposal.
Nothing is recorded without your approval. In addition:
- The assistant works with your rights. If your role may not create anything in a section, the assistant cannot record anything there either.
- Risks, controls, SoA justifications, documents, folders and proposals on a process step appear in the audit trail, with the assistent (assistant) as actor and you as the person who approved it. Internal control findings, actions, responses and control plans appear under your name, as gebruiker (user). Process steps and connections are not logged in the audit trail.
- Afterwards, check in the app what the assistant recorded as a proposal or draft, such as an SoA justification or a draft document.
Fixed ways of working
Section titled “Fixed ways of working”With IRMA Management, the assistant follows fixed ways of working (work instructions) for recurring ISMS tasks, such as adding to the risk register, drafting an ISMS or policy document, drawing a process flow and recording findings in internal control. Each follows the same order: read first, then a proposal, then your approval. In the chat you then see Load instructions: …; see Work instructions.
Without IRMA Management the assistant records nothing. If you ask it to anyway, it explains how to do it yourself, for example with Importeren (Import) or in Beheersmaatregelen (Controls).