
IRMA: risk management
This page is for everyone who records, assesses or reports on risks in the IRMA app: risk managers, CISOs, risk owners and managers. It explains how the risk register works and how to get from a loose list of risks to a well-founded risk picture.
New to IRMA? Start at IRMA: getting started: it explains how to open the app at app.prudai.com/irma, how the menu works and how registers work in general. Controls, standards frameworks and audits are on IRMA: controls and audit. Settings such as risk areas, risk tags and likelihood and consequence classes are on IRMA: administration.
The IRMA app is in Dutch. This page quotes the Dutch labels with an English gloss. Which parts you see depends on the modules enabled for your organization and on your role. If you don’t see a button, or IRMA says you have no rights for it, ask your administrator.
Where to find it
Section titled “Where to find it”Everything about risks sits in the menu under Risicomanagement (Risk management):
| Menu item | What you do there |
|---|---|
| Risico’s (Risks) | The risk register: record, filter and open risks. |
| Beheersmaatregelen (Controls) | The controls that reduce your risks. See IRMA: controls and audit. |
| Analyse & heatmap (Analysis & heatmap) | The current risk picture as a heatmap, plus how it developed over time. |
| Risicomatrix (Risk matrix) | Risk areas against risk categories, with the number of risks per cell. |
| Monte Carlo / VaR | A simulation of the annual loss across your financially estimated risks. |
| Rapporten (Reports) | Print-ready reports, such as the risk profile. |
| Assessment-uitvraag (Assessment survey) | Have risks assessed by owners or a group, by email. |
At the top of the menu, directly below Overzicht (Overview), there is also Impact en beheersing (Impact and control): a dashboard that sets your systems against your standards framework. See The business impact and control dashboard.
The risk register
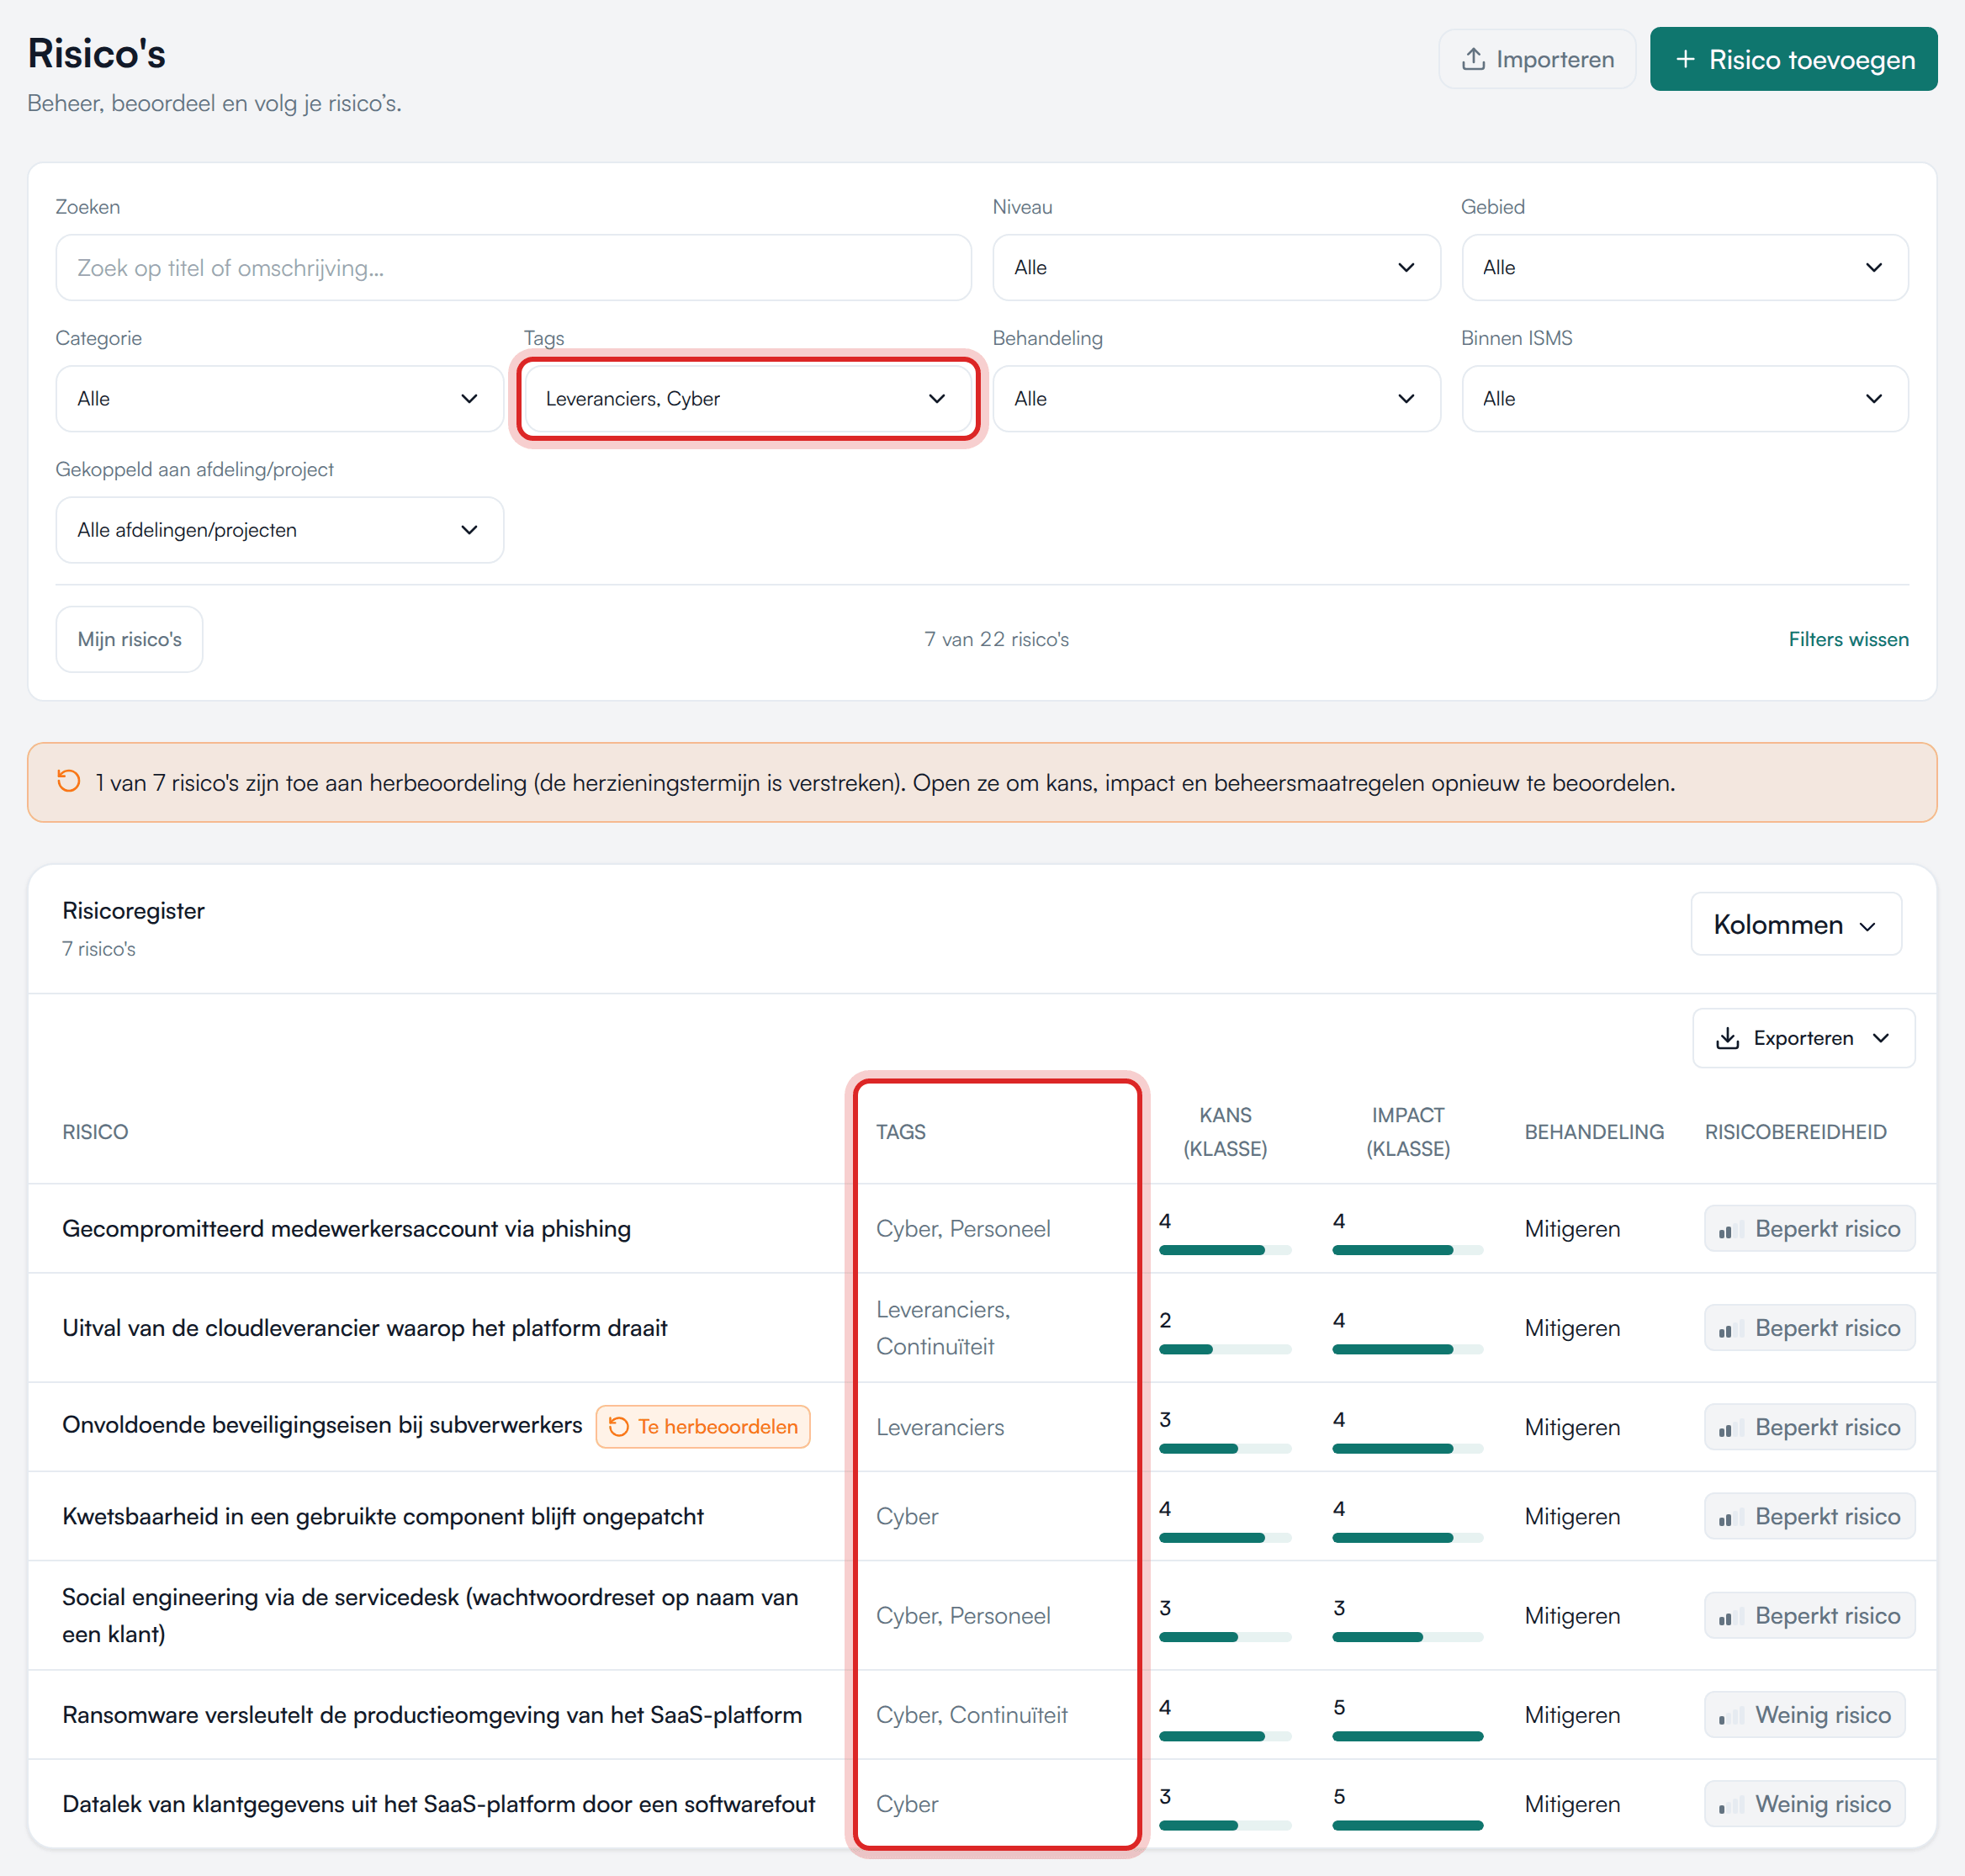
Section titled “The risk register”Open Risicomanagement → Risico’s. If some risks need attention, IRMA says so above the register. In the list those risks get a label:
- Te beoordelen (To be assessed): no treatment has been chosen yet.
- Te herbeoordelen (Due for reassessment): the review period has passed.
Filter and search
Section titled “Filter and search”The filters sit above the register. They work together: a risk must match every filter you choose.
- Zoeken (Search): by title or description.
- Niveau (Level): strategic, tactical, operational or not classified.
- Gebied (Area) and Categorie (Category): your organization’s risk taxonomy.
- Tags: choose one or more tags. A risk is included as soon as it has one of the chosen tags. This filter appears once your organization has tags.
- Behandeling (Treatment): Open, Mitigeren (mitigate), Accepteren (accept), Vermijden (avoid) or Overdragen (transfer).
- Binnen ISMS (Within ISMS): Ja or Nee (yes or no).
- Gekoppeld aan afdeling/project (Linked to department/project): appears once there are departments or projects.
- Mijn risico’s (My risks): only the risks you own.
Below the filters you see how many risks remain. Filters wissen (Clear filters) starts over.
Columns, sorting and export
Section titled “Columns, sorting and export”- Kolommen (Columns) lets you choose which columns you see, for example Tags, Eigenaar (Owner), Kans per jaar (Likelihood per year) or Financieel gevolg (€) (Financial consequence). Your choice is remembered on this device.
- Click a column header to sort. Drag a column header to change the order.
- Exporteren (Export) saves the register as Excel (.xlsx) or CSV (.csv). The export contains the columns and rows you see at that moment, so your filters apply. How export works in every register is described under Working with registers.
Click a risk and choose Openen (Open) to open the risk page.
Adding a risk
Section titled “Adding a risk”- In the register, click Risico toevoegen (Add risk). The Nieuw risico (New risk) form opens.
- Fill in the Titel (Title). It is required. An Omschrijving (Description) helps your colleagues.
- Choose Kans (1–5) (Likelihood) and Impact (1–5). Below each choice you see what that class means in your organization.
- Add what you already know: Risiconiveau (Risk level), Risicogebied (Risk area), Risicocategorie (Risk category), Eigenaar-afdeling (Owner department) and Tags.
- Leave Binnen ISMS-scope (Within ISMS scope) on for an information security risk. Turn it off for a broader business risk that falls outside the ISMS.
- Want the risk to count in the Monte Carlo simulation? Then enter the loss under Financiële impact (VaR) (Financial impact). See Monte Carlo / VaR.
- Click Opslaan (Save). The new risk’s page opens.
At the bottom of the form you see straight away Binnen de acceptatiecriteria (Within the acceptance criteria) or Buiten de acceptatiecriteria (Outside the acceptance criteria). If the risk falls outside, you later link controls to lower the net risk.
Reference for likelihood and impact
Section titled “Reference for likelihood and impact”Unsure whether a likelihood is 3 or 4? Click Referentiebeeld kans en impact (Reference for likelihood and impact) at the likelihood and impact choice. You then see your own organization’s classes:
- Kansklassen (Likelihood classes): a description and the Kans per jaar (Likelihood per year) for each class.
- Gevolgklassen (impact) (Consequence classes): for each class, what it means on each of your organization’s consequence axes, such as financial consequence or reputational damage.
Referentiebeeld verbergen (Hide reference) collapses it again.
If your organization has not set its own classes yet, you see the default scale from 1 (lowest) to 5 (highest). An administrator sets the classes under Beheer (Administration) → Kansen en gevolgen (Likelihood and consequences). See IRMA: administration.
Consequence axes
Section titled “Consequence axes”Does your organization work with consequence axes, such as financial consequence or reputational damage? Then you score a level from 1 to 5 or N.v.t. (not applicable) per axis. IRMA then calculates the impact from those scores; you see it as Impact (berekend) (calculated impact).
The risk page
Section titled “The risk page”At the top of the risk page are the title, the description and the tags, with three buttons: Herbeoordelen (Reassess), Bewerken (Edit) and Verwijderen (Delete). Below them are sections you expand and collapse. The main ones:
| Section | What you see or do there |
|---|---|
| Netto restrisico (Net residual risk) | A bar from gross to net, with the Restrisicoklasse (residual risk class) and the verdict on risk appetite. Click the bar to jump to the linked controls. |
| Gekoppelde beheersmaatregelen (Linked controls) | Use Beheersmaatregel koppelen (Link control) to link the controls that lower this risk. Use Aandeel (Share) to divide how much each control contributes. |
| Gecombineerde mitigatie-inschatting (Combined mitigation estimate) | One estimate for all linked controls together. See Mitigation: gross to net. |
| ERM-classificatie (ERM classification) | Risiconiveau, Binnen ISMS-scope, Risicogebied, Risicocategorie and Eigenaar-afdeling. |
| Kans (Likelihood) | The Kansklasse (1–5) (likelihood class) and an exact Jaarkans (%) (annual likelihood). Kans opslaan (Save likelihood) records a reassessment moment. |
| Financiële impact (VaR) (Financial impact) | Minimum, expected and maximum loss and the likelihood per year, for the simulation. |
| Gekoppelde doelen en processen (Linked goals and processes) | Organizational goals and processes this risk belongs to. |
| Eigenaarschap & context (Ownership & context) | The departments and projects where the risk applies. |
| Beleid & normen (Policy & standards) | Policy documents and standards the risk stems from. |
| Mutatiehistorie (Change history) and Herbeoordelingshistorie (Reassessment history) | What changed and when. |
| Behandeling & risicobereidheid (Treatment & risk appetite) | The treatment, the risk appetite and the status. |
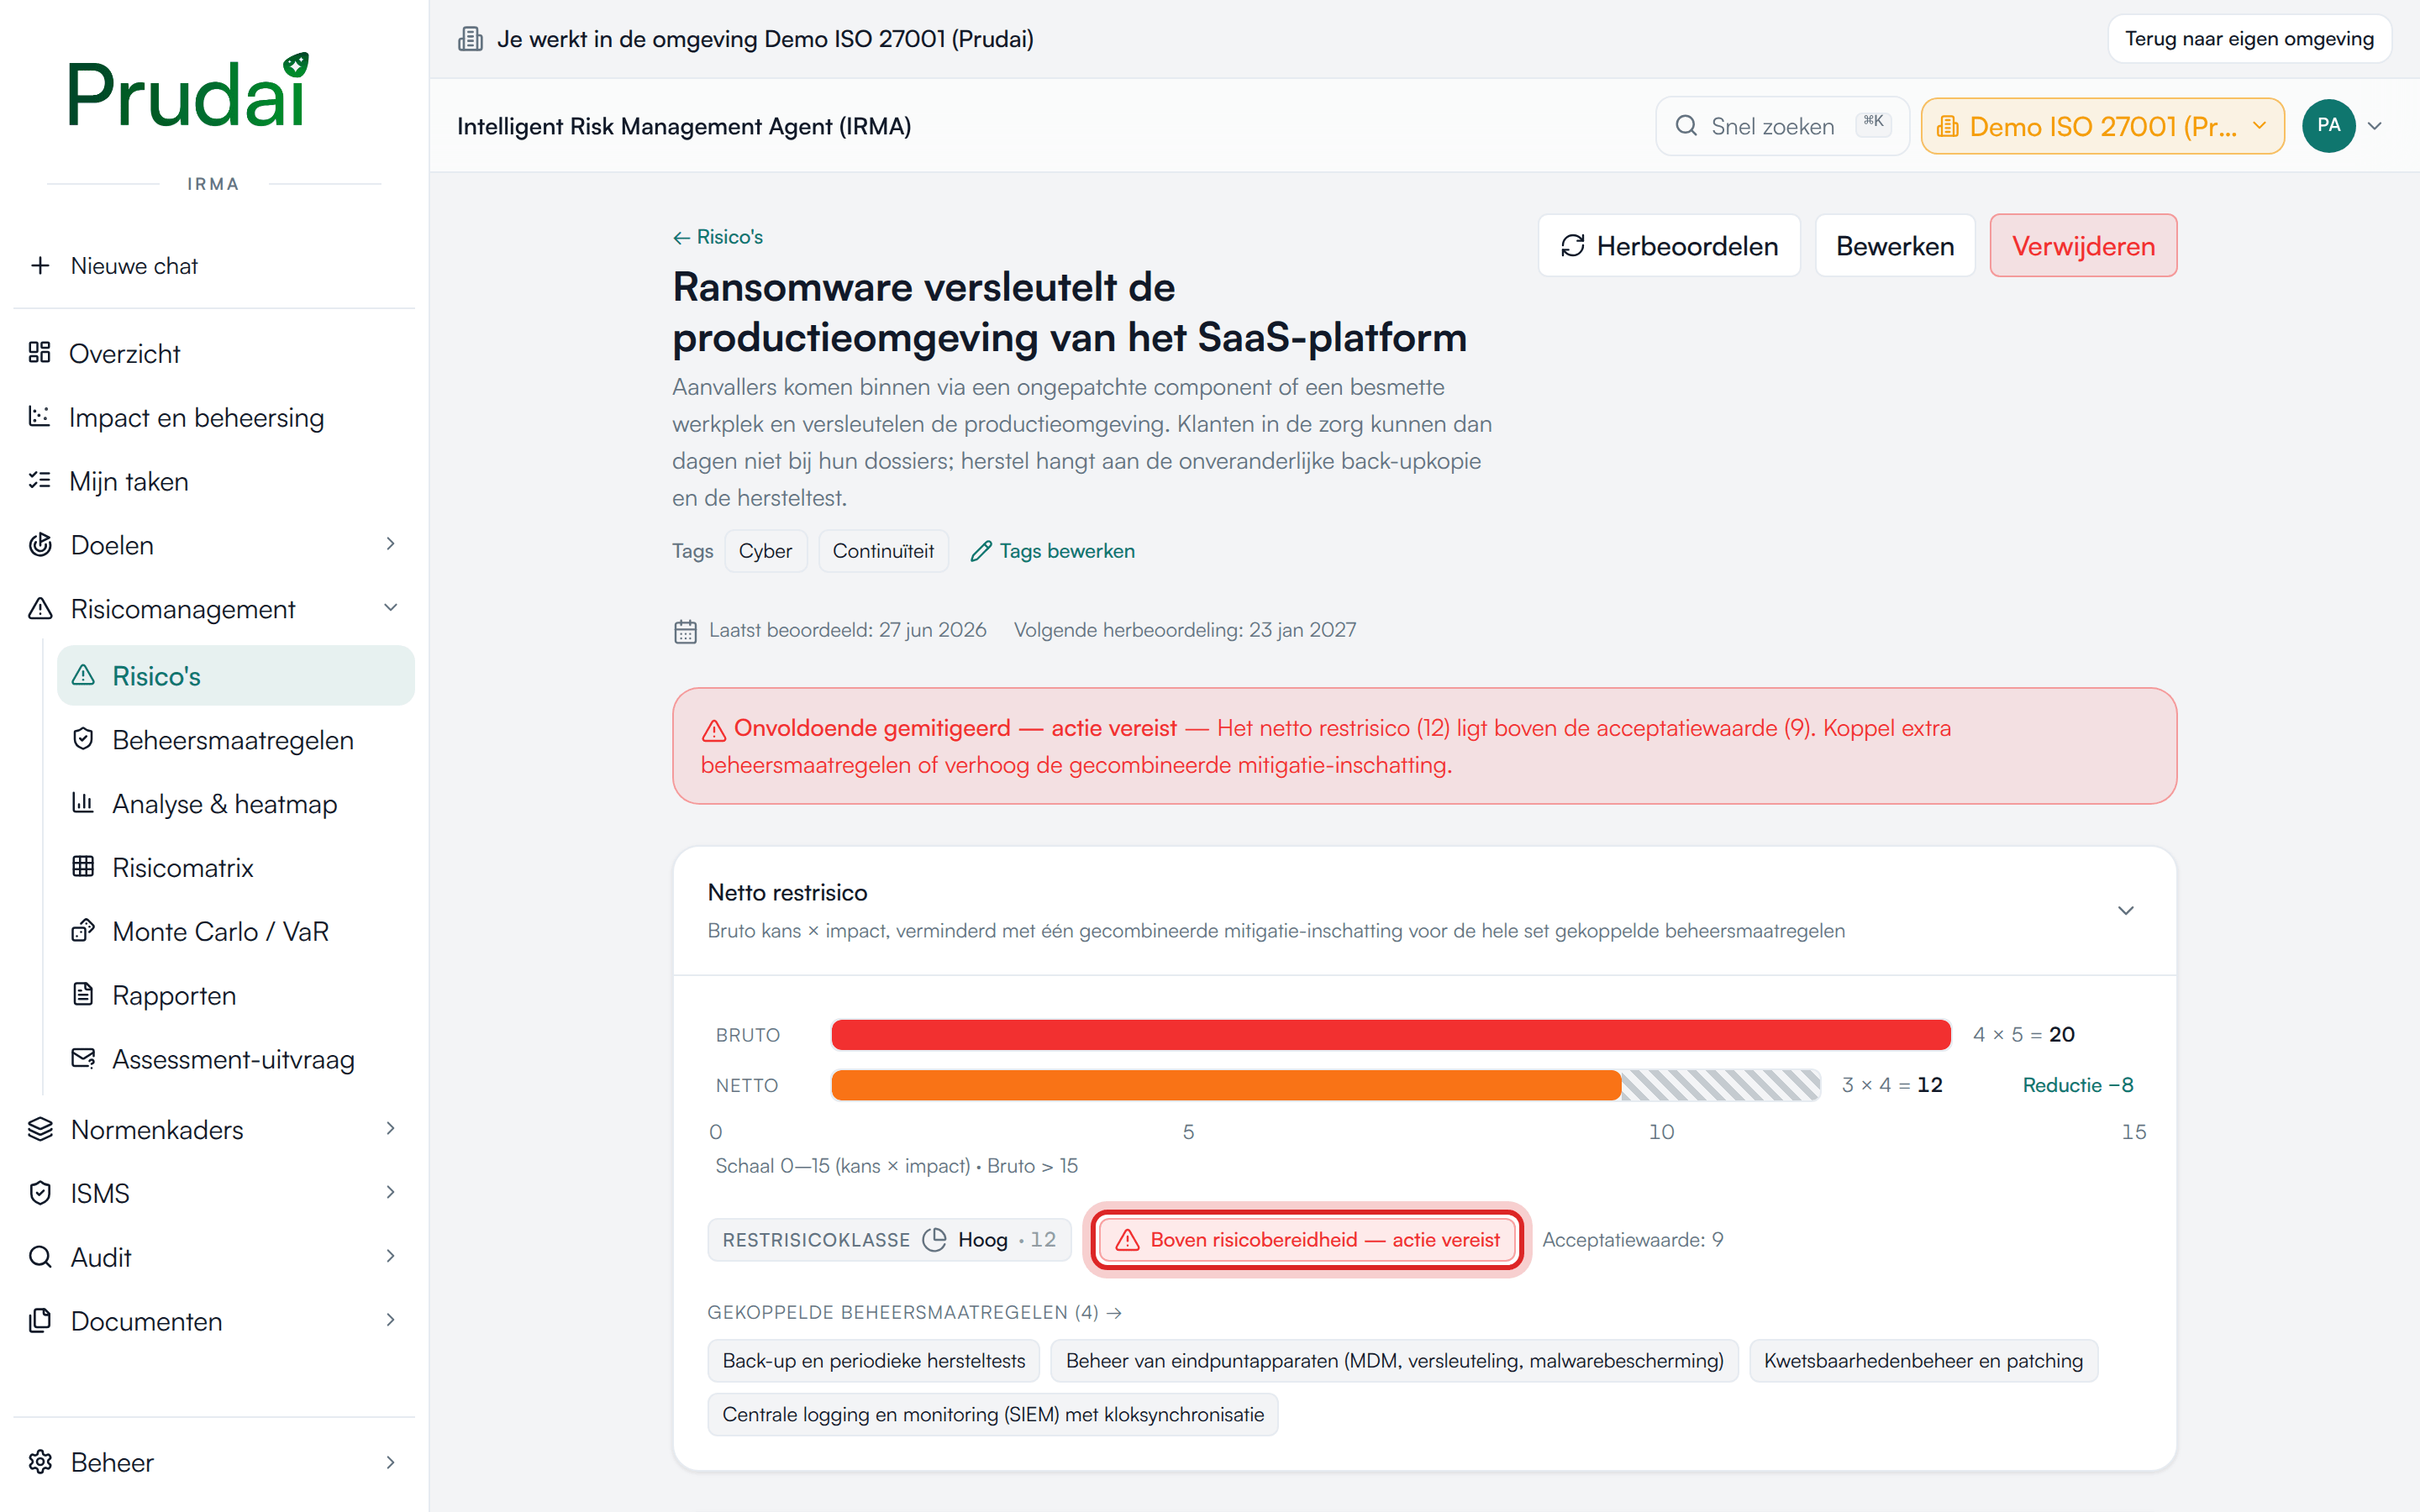
Bewerken (Edit) lets you change the title, description, likelihood, impact and Behandeling (Treatment).
For Risiconiveau (Risk level), IRMA sometimes makes a suggestion: a risk linked to an organizational goal is a strategic candidate; a risk linked to a process is a tactical candidate. Suggestie overnemen (Accept suggestion) applies it. Your own choice always wins.
Tags group risks across area and category, for example per project or per theme. A risk can have several tags.
- In the header of the risk page, click Tags toevoegen (Add tags) or Tags bewerken (Edit tags).
- Type in the tag field. Under Voorgestelde tags (Suggested tags), pick an existing tag with Enter.
- If the tag doesn’t exist yet, choose Nieuwe tag „…” aanmaken (Create new tag).
- Click a tag in the header to see all risks with that tag in the register.
You also use tags to select risks in Monte Carlo, in reports and in the assessment survey. The register has a Tags column; turn it on under Kolommen (Columns). Once the column is on, it is also included in the export.
Renaming, changing the order or deactivating tags is done under Instellingen (Settings) → Risicotags (Risk tags). The Tags beheren (Manage tags) link next to the tag field opens that page in a new tab, so your form stays as it is. An inactive tag stays on risks that already have it, but is no longer suggested. If you type its exact name, it appears in the suggestions marked (inactief) (inactive). See Risk tags.
Risk appetite
Section titled “Risk appetite”Risk appetite says how much residual risk you accept for this risk. There are four settings:
- Weinig risico (Little risk): act quickly.
- Beperkt risico (Limited risk)
- Aanzienlijk risico (Considerable risk)
- Veel risico (High risk)
IRMA shows the appetite as bars in a neutral colour: more bars means more accepted risk. Only the verdict gets a colour: Binnen risicobereidheid (Within risk appetite), or Actie vereist (Action required) when the net risk is above it. If you formally accepted a higher residual risk, it says Geaccepteerd (Accepted).
A new risk gets the appetite Beperkt risico (Limited risk). You set a different appetite through Importing, in the Risicobereidheid (Risk appetite) column. Note: that column only accepts fixed values; see Values for Behandeling and Risicobereidheid.
Mitigation: gross to net
Section titled “Mitigation: gross to net”The gross risk is likelihood × impact without controls. The net risk is what remains after your controls.
- Under Gekoppelde beheersmaatregelen (Linked controls), link the controls that lower the risk.
- Under Gecombineerde mitigatie-inschatting (Combined mitigation estimate), choose for Kans verlagen met (Lower likelihood by) and Impact verlagen met (Lower impact by) how many classes the controls make together, for example −1 klasse (−1 class). −1 on likelihood means: the likelihood drops one class, from 4 to 3.
- Explain why under Onderbouwing (Justification). Justify the effect of all linked controls together, not per control.
If the net risk stays above the acceptance value, you see Onvoldoende gemitigeerd — actie vereist (Insufficiently mitigated — action required). Link extra controls or adjust the estimate.
If an audit shows that a linked control does not work, IRMA proposes a recalculation on the risk page. Nothing changes by itself: you choose Herrekening toepassen (Apply recalculation).
Reassessing
Section titled “Reassessing”Has a risk materialized, or has its review period passed? Click Herbeoordelen (Reassess).
- Fill in Nieuwe kans (1–5) (New likelihood) and Nieuwe impact (1–5) (New impact).
- To adjust the mitigation too, open Geavanceerd: mitigatie-inschatting (Advanced: mitigation estimate).
- Describe what happened under Aanleiding / onderbouwing (Reason / justification).
- Choose when the Volgende herbeoordeling (Next reassessment) is due and click Herbeoordeling vastleggen (Record reassessment).
The previous values are kept in the Herbeoordelingshistorie (Reassessment history).
Deleting a risk
Section titled “Deleting a risk”Click Verwijderen (Delete) and confirm. This cannot be undone; there is no recycle bin.
A deleted risk disappears from the register, the matrix, search, exports, reports, the management review, the internal audit and new or running assessments and simulations. Two exceptions keep the history honest:
- A closed assessment still shows the risk as it was, labelled Verwijderd (Deleted).
- A previously completed Monte Carlo simulation leaves the risk out of the sensitivity analysis, but its outcomes still include it. The simulation says so. Start a new simulation for outcomes without the deleted risk.
Assessment survey
Section titled “Assessment survey”An assessment survey lets the people who know the risks assess them. They receive an email with a personal link; they don’t need an IRMA account for it.
There are two kinds:
- Eigenaar-uitvraag (Owner survey): each risk owner confirms or changes their own risks and can report new ones.
- Groepsassessment (Group assessment): several participants score the same set of risks on likelihood and consequence. Afterwards you see the spread and how much the group agrees.
Setting up a campaign
Section titled “Setting up a campaign”- Go to Risicomanagement → Assessment-uitvraag and click Nieuwe campagne (New campaign).
- Basis (Basics): choose the Soort uitvraag (Survey type), a Naam (Name), an Omschrijving (Description, included in the email) and the Antwoord-deadline (Response deadline). The type is fixed once created.
- Scope: narrow the risks by Afdelingen (Departments), Risicogebied (Risk area) or Tags. Nothing or everything ticked means: all risks.
- Risico’s (Risks): untick the risks that should not take part.
- Gevolgtypen (Consequence types, group assessment only): choose which consequence axes participants score. By default that is only the financial consequence.
- Weergave (Display): under Weergave voor de respondent (Display for the respondent), choose whether respondents see the risk’s current values or score blind, without prior knowledge. If you choose two or more departments for a new group assessment, Eén campagne per afdeling aanmaken (Create one campaign per department) here creates a separate campaign per department, with its own risks and participants.
Once sent, the scope and consequence types are fixed.
Sending
Section titled “Sending”- Owner survey: open Versturen (Send) and choose the Verzendmodus (Send mode). Per eigenaar (Per owner) sends each owner one email with their list of risks. Per afdeling (Per department) sends one survey to the department manager; name and address come from the department register. Fill in missing email addresses, if needed with Kies uit personenregister… (Choose from people register).
- Group assessment: add the people under Deelnemers (Participants), for example from the Personenregister (People register).
Click Controleren (Check). You then see the address and the risks per recipient. Only then click Definitief versturen (Send definitively). People without an email address receive no email.
What the respondent sees
Section titled “What the respondent sees”Through the link the respondent opens the Risk assessment page (owner survey) or the Group assessment page. At the top they switch language with Nederlands | English; answers already filled in are kept. Amounts and dates stay in Dutch notation. The labels below are from the English version of the page.
- In an owner survey they choose Confirm — still accurate or Change — the risk has changed per risk, with a new likelihood and impact. Under Report a new risk they report a risk that is missing.
- In a group assessment they score each risk on likelihood and on the consequence dimensions. If they have no view on a risk, they leave it blank. At the bottom they can propose new risks.
- They send everything at once. After that they can’t change anything.
After the deadline, or once you close the campaign, the link is closed.
Following up and reviewing
Section titled “Following up and reviewing”Open a campaign to see its progress.
- Herinnering sturen (Send reminder) emails a fresh link to everyone who hasn’t finished. To approach one person again, use Opnieuw sturen (Send again) next to that participant.
- In an owner survey the answers are under Te beoordelen voorstellen (Proposals to review). Choose Accepteren (Accept) or Afwijzen (Reject). Accepting records the new likelihood and impact as a reassessment. You accept reported new risks the same way; they then go into the register.
- In a group assessment, Spreiding & consensus (Spread & consensus) shows the average, the median and the spread per risk. Click Beoordelen (Review) and slide the final value for each dimension. Akkoord (Approve) records it in the register.
- If nobody scored the likelihood, it stays unchanged. To set it anyway, click Kans zelf vaststellen (Set likelihood yourself). Toch ongewijzigd laten (Leave unchanged after all) switches the slider off again.
Done? Click Campagne sluiten (Close campaign).
Analysis & heatmap
Section titled “Analysis & heatmap”Analyse & heatmap (Analysis & heatmap) shows the current risk picture. The filters are the same as in the register, so you can, for example, look only at the risks with one tag.
- The heatmap Risicomatrix (5×5) (Risk matrix) sets likelihood against impact. Switch between Bruto (Gross) and Netto (Net). Click a cell to see the risks in that square.
- Next to it you see whether risks exceed the risk appetite, the Risico’s per categorie (Risks per category) and the Behandelmix (Treatment mix).
- Historie vergelijken (Compare history) shows the risk picture on a chosen Peildatum (Reference date). Moment toevoegen (Add moment) puts up to three moments side by side.
Risk matrix
Section titled “Risk matrix”The Risicomatrix (Risk matrix) sets your risk areas against your risk categories. Each cell shows the number of risks; the colour follows the heaviest gross score in that cell. Click a cell to open the register filtered on that area and category.
The matrix fills up as risks get an area and a category. Risks without both count as Niet geclassificeerd (Not classified). An administrator manages areas and categories; see Risk taxonomy.
Monte Carlo / VaR
Section titled “Monte Carlo / VaR”Monte Carlo / VaR simulates the annual loss across your risks that have a financial estimate. The result is a Value-at-Risk: with 90% certainty, the total annual loss stays below that amount.
Starting a simulation
Section titled “Starting a simulation”- Make sure your risks have a financial estimate: on the risk page under Financiële impact (VaR), with an expected amount or with both a minimum and a maximum. Without an estimate, a risk does not take part.
- Click Nieuwe simulatie (New simulation).
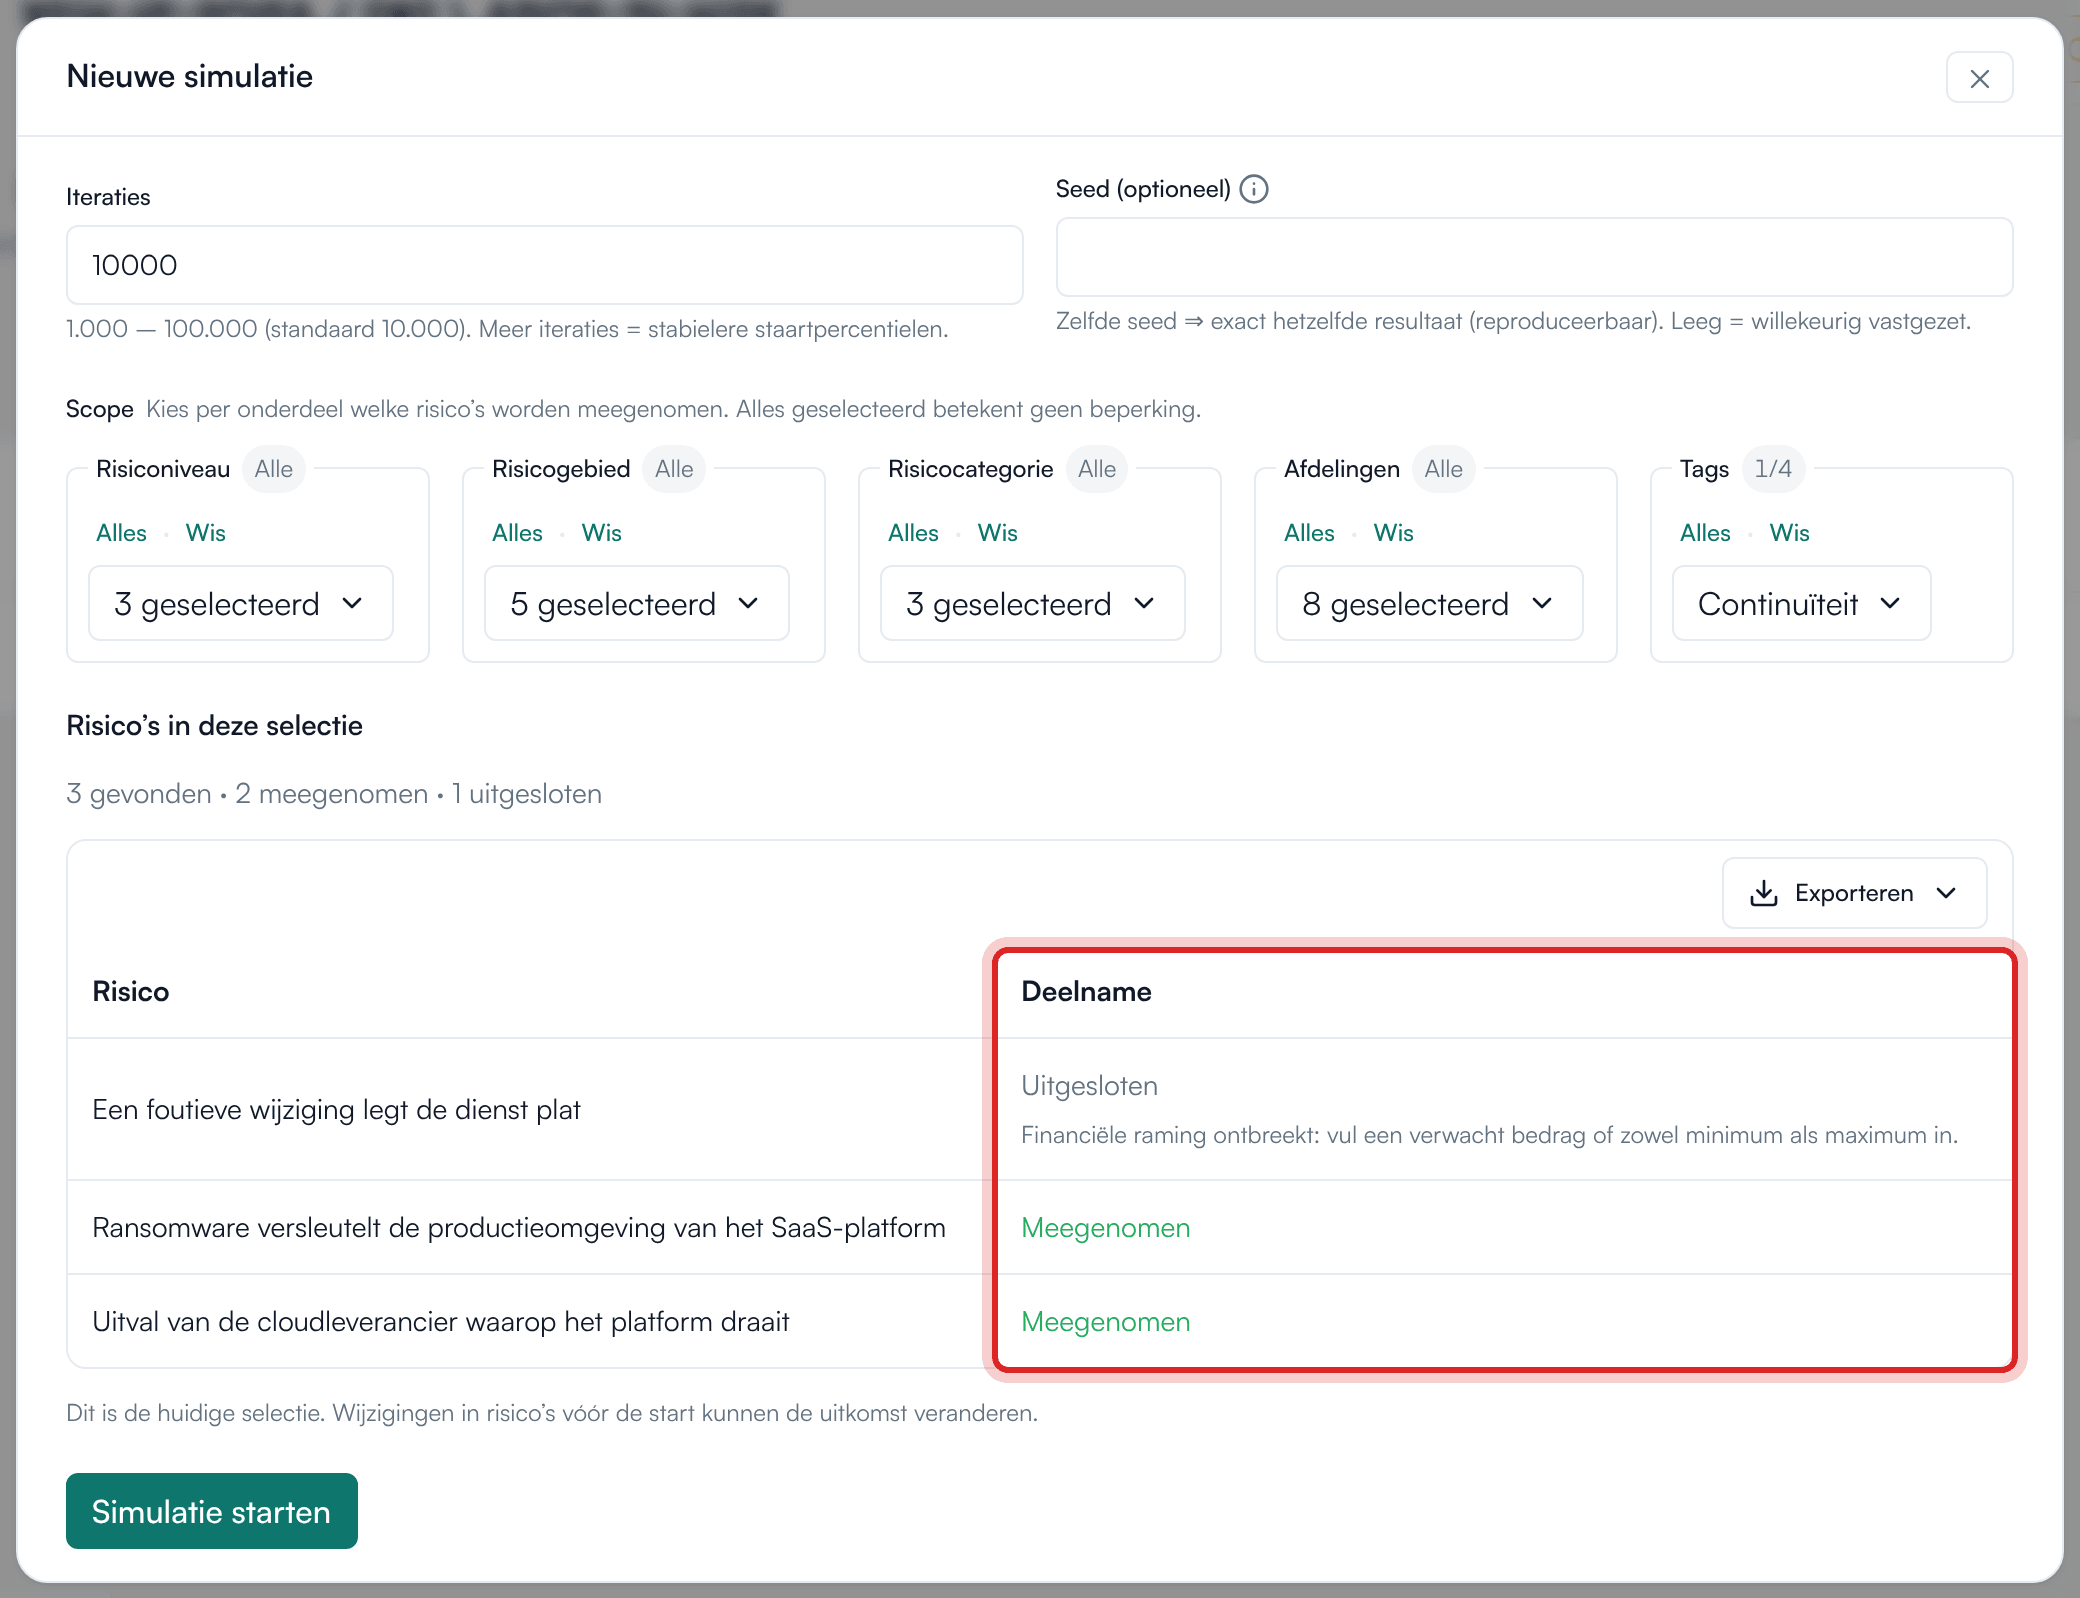
- Under Scope, choose which risks take part: by Risiconiveau (Risk level), Risicogebied (Risk area), Risicocategorie (Risk category), Tags or Afdelingen (Departments).
- Under Risico’s in deze selectie (Risks in this selection) you see beforehand which risks are Meegenomen (Included) and which are Uitgesloten (Excluded), and why.
- Optionally choose the number of Iteraties (Iterations, 10,000 by default) and a Seed. The same seed gives exactly the same outcome.
- Click Simulatie starten (Start simulation).
Reading the result
Section titled “Reading the result”- Value-at-Risk (P90): the key figure.
- Percentielen (jaarschade) (Percentiles, annual loss) and the Gemiddelde (Average).
- A histogram with the distribution of the simulated annual loss.
- Gevoeligheidsanalyse (Sensitivity analysis): each risk’s share of the total expected annual loss.
By default the page shows the latest completed simulation. Earlier runs are in the Runhistorie (Run history). If you are looking at an older run, Laatste afgeronde simulatie tonen (Show latest completed simulation) takes you back.
Reports
Section titled “Reports”Under Rapporten (Reports) → Genereren (Generate) you create a print-ready report.
- Choose the Rapporttype (Report type): Risicoprofiel (Risk profile), Verklaring van Toepasselijkheid (SoA) (Statement of Applicability), Maatregelstatus (Control status) or Auditresultaat (Audit result).
- For the risk profile, narrow the Scope by risk level, risk area, departments or Tags.
- Under Uitvoer (Output), optionally choose a Rapportsjabloon (Report template) and the Formaat (Format): PDF, Word (docx), Excel (xlsx) or Markdown (direct in de browser) (Markdown, straight in the browser).
- For Markdown, click Rapport genereren (Generate report). You see a preview that you print with Afdrukken / PDF (Print / PDF) or save with Download .md.
- For PDF, Word or Excel, click Rapport genereren (server-side). The report appears under Eerdere rapporten (Earlier reports), where you download it.
The other tabs set up reporting further: Sjablonen (Templates, reports built from blocks), Huisstijl (House style, the logo on every report), KPI’s and Dashboards per role.
The business impact and control dashboard
Section titled “The business impact and control dashboard”In the menu, click Impact en beheersing (Impact and control), directly below Overzicht (Overview). The Bedrijfsimpact en beheersing (Business impact and control) dashboard answers two questions: which systems matter for your business goals, and how well are they controlled according to your standards framework? What matters and is not in order, you tackle first.
How to fill the dashboard:
- Record your systems under Registers → Informatiesystemen (Information systems).
- Choose Bewerken (Edit) for a system. The form has the Impact op bedrijfsdoelen (Impact on business goals) block, with four dimensions: Financieel (Financial), Operationeel (Operational), Klant (Customer) and Reputatie (Reputation). For each dimension choose Laag, Midden or Hoog (low, medium or high), or leave it at Nog niet ingeschat (Not yet assessed). Fill in what you know; the rest can wait. In the register, the Bedrijfsimpact (Business impact) column shows each system’s highest assessed impact.
- Open the system and, under Maatregelen op dit systeem (Controls on this system), link the controls that apply to it with Maatregel koppelen… (Link control…). Naar impact en beheersing (To impact and control) takes you from the system to the dashboard.
- Link processes to organizational goals and systems to processes.
- Make sure your controls are linked to the requirements of the standards framework. You do not create these links by hand: they come from the crosswalk. If Normenkaders (Standards frameworks) shows suggestions under AI-voorgestelde crosswalk-koppelingen (AI-suggested crosswalk links), approve or reject them. Once a control has links, you see them for that control under Deze maatregel voldoet aan (This control satisfies); without a link that block is not shown. See Standards frameworks.
- Choose the Normenkader (Standards framework) at the top of the dashboard.
As long as no system has both an impact and a degree of control, the dashboard opens with Zo vul je dit dashboard (How to fill this dashboard). After that, the Nog aan te vullen (Still to complete) block shows which steps are still open.
What you see:
- Four key figures: Totaalscore (Total score), Impact op bedrijfsdoelen (Impact on business goals), Mate van beheersing (Degree of control) and Eerst oppakken (Tackle first).
- De impact voor het bedrijf (The impact on the business): the chain from organizational goals through business processes to the critical systems.
- Risicoprofiel (Risk profile): each system on impact and degree of control. Top right are the systems that matter and are not in order.
- Mate van beheersing (Degree of control): per domain of the standards framework, how well the requirements are covered.
- Systemen en hun impact (Systems and their impact): a table sorted by priority. Open a system for its weakest requirements per domain. Impact en maatregelen aanpassen (Edit impact and controls) takes you to that system in Informatiesystemen.
Hoe rekenen we? (How do we calculate?) explains exactly how the four scores are derived.
Importing risks from Excel or CSV
Section titled “Importing risks from Excel or CSV”Already have a list of risks in Excel? Then you don’t need to retype it.
- In the risk register, click Importeren (Import). The import wizard opens with Risico’s (Risks) already selected.
- Under Bestand (Excel of CSV) (File, Excel or CSV), choose your file. You can also paste data, for example cells copied from Excel.
- IRMA detects the Tabblad (Sheet), the Scheidingsteken (Delimiter) and the Rij met kolomkoppen (Header row) by itself. Under Zo leest IRMA je bestand (How IRMA reads your file) you see a preview. If it’s wrong, adjust it.
- Under Kolommen koppelen (Map columns), map each field to a column in your file. Titel (Title), Inherente kans (1–5) (Inherent likelihood) and Inherente impact (1–5) (Inherent impact) are required. Omschrijving (Description), Categorie (Category), Behandeling (Treatment) and Risicobereidheid (Risk appetite) are optional.
- Under Validatie (Validation) you see per row whether it is Geldig (Valid) or has a Fout (Error). Nothing has been saved yet.
- Click Importeer … geldige rijen (Import … valid rows). Rows with errors are skipped.
IRMA can’t read an old Excel file (.xls) or a password-protected workbook. Save it in Excel as .xlsx without a password, or as CSV.
Values for Behandeling and Risicobereidheid
Section titled “Values for Behandeling and Risicobereidheid”The Behandeling (Treatment) and Risicobereidheid (Risk appetite) columns only accept these values. Upper or lower case does not matter.
| Column | Put in your file | Becomes in IRMA |
|---|---|---|
| Behandeling (Treatment) | open, mitigate, accept, avoid, transfer | Open, Mitigeren (Mitigate), Accepteren (Accept), Vermijden (Avoid), Overdragen (Transfer) |
| Risicobereidheid (Risk appetite) | low, medium, high, critical | Weinig risico (Little risk), Beperkt risico (Limited risk), Aanzienlijk risico (Considerable risk), Veel risico (High risk) |
An empty cell becomes Open for Behandeling and Beperkt risico for Risicobereidheid. A Dutch label such as “Mitigeren” or “Weinig risico” gives a Fout (Error) under Validatie (Validation); the message lists the allowed values.
Read access per department
Section titled “Read access per department”After consultation within your organization, an administrator can set up that employees only read the data of their own department and the departments below it. That applies not only to risks but also to controls and tasks, among other things. Registers then show how many items you see out of the total. Organization-wide overviews, such as the Impact en beheersing (Impact and control) dashboard, Monte Carlo and reports, are then only available to people who may read the whole organization. Others see Dit overzicht is alleen beschikbaar voor wie de hele organisatie mag lezen… (This overview is only available to people who may read the whole organization…). See Read access per department.
Read more
Section titled “Read more”- IRMA: getting started: opening the app, the menu and registers in general.
- IRMA: controls and audit: controls, standards frameworks, the SoA, processes, evidence and audits.
- IRMA: administration: roles, taxonomy, risk tags, classes and modules.
- Working with the IRMA assistant: discussing risks with the assistant, which reads along in your registers.